VM Serial Console part 2

Fooling around a bit more with accessing a VM's serial console from a KVM hypervisor with

virsh console mymachine

I found one thing that doesn't carry over from the host to the VM is the terminal window size, so if you try to use something like vim through the console connection, it seems to assume a 80x25 or so window, and when vim exits your console is all screwed up.

It looks like a serial connection doesn't have an out-of-band way of passing that info the way telnet or ssh does, so you have set it manually. You can discover your settings on the host machine with

stty size

which should show something like:

60 142

on the VM, the same command probably shows

0 0

zero rows and columns, no wonder it's confused. Fix it by setting the VM to have the same rows and columns as the host with something like:

stty rows 60 columns 142

and you're in business.

Enabling VM serial console on stock Ubuntu 10.04 server

So I've been running Ubuntu 10.04 server virtual machines on a host running KVM as the hypervisor, and thought I should take a look at accessing the VM's console from the host, in case there's a problem with the networking on the VM.

The hosts's VM libvirt definition shows a serial port and console defined with

<serial type='pty'>
  <source path='/dev/pts/1'/>
  <target port='0'/>
  <alias name='serial0'/>
</serial>
<console type='pty' tty='/dev/pts/1'>
  <source path='/dev/pts/1'/>
  <target type='serial' port='0'/>
  <alias name='serial0'/>
</console>

and within the stock Ubuntu 10.04 server VM, dmesg | grep ttyS0 shows:

[    0.174722] serial8250: ttyS0 at I/O 0x3f8 (irq = 4) is a 16550A
[    0.175027] 00:05: ttyS0 at I/O 0x3f8 (irq = 4) is a 16550A

So the virtual hardware is all setup on both ends, but ps aux | grep ttyS0 doesn't show anything

We need to have a process listening to that port. To do that, create a file named /etc/init/ttyS0.conf with these contents:

# ttyS0 - getty
#
# This service maintains a getty on ttyS0 from the point the system is
# started until it is shut down again.

start on stopped rc RUNLEVEL=[2345]
stop on runlevel [!2345]

respawn
exec /sbin/getty -L 38400 ttyS0 xterm-color

and then run

initctl start ttyS0

back in the host machine run virsh list to find the name or id number of your VM, and then

virsh console <your-vm-name-or-number>

to connect, hit return and you should see a login prompt.

Customizing cloned Ubuntu VMs

I was playing with creating and cloning Ubuntu virtual machines the other day, and got to the point where I had a nicely setup reference image that I could just copy to fire up additional VMs that would be in a pretty usable state.

There are a few things within a cloned VM that you'd want to change if you were going to keep the new instance around, such as the hostname, SSH host keys, and disk UUIDs. I threw together a simple shell script to take care of these things automatically.

#!/bin/sh
#
# Updates for cloned Ubuntu VM
#

#
# Some initial settings cloned from the master
#
ROOT=/dev/vda1
SWAP=/dev/vdb1
LONG_HOSTNAME=ubuntu.local
SHORT_HOSTNAME=ubuntu

if [ -z $1 ]
then
    echo "Usage: $0 <new-hostname>"
    exit 1
fi

# 
# Update hostname
#
shorthost=`echo $1 | cut -d . -f 1`
echo $1 >/etc/hostname
hostname $1
sed -i -e "s/$LONG_HOSTNAME/$1/g" /etc/hosts
sed -i -e "s/$SHORT_HOSTNAME/$shorthost/g" /etc/hosts

#
# Generate new SSH host keys
#
rm /etc/ssh/ssh_host_*
dpkg-reconfigure openssh-server

#
# Change root partition UUID
#
OLD_UUID=`blkid -o value $ROOT | head -n 1`
NEW_UUID=`uuidgen`
tune2fs -U $NEW_UUID $ROOT
sed -i -e "s/$OLD_UUID/$NEW_UUID/g" /etc/fstab /boot/grub/grub.cfg

#
# Change swap partition UUID
#
OLD_UUID=`blkid -o value $SWAP | head -n 1`
NEW_UUID=`uuidgen`
swapoff $SWAP
mkswap -U $NEW_UUID $SWAP
swapon $SWAP
sed -i -e "s/$OLD_UUID/$NEW_UUID/g" /etc/fstab

#
# Remove udev lines forcing new MAC address to probably show up as eth1
#
sed -i -e "/PCI device/d"     /etc/udev/rules.d/70-persistent-net.rules
sed -i -e "/SUBSYSTEM==/d" /etc/udev/rules.d/70-persistent-net.rules

echo "UUID and hostname updated, udev nic lines removed,  be sure to reboot"

I'd then run it on the cloned machine with something like

update_clone.sh mynewmachine.foobar.com

This somewhat particular to my specific master VM, in that it's expecting one disk dedicated to root and one disk dedicated to swap, and the VM was created with ubuntu.local as the hostname. Hopefully though it'll give some ideas about what to look for and how to script those changes.

WTF!, when did those files get deleted ?!

A guy I work with recently showed me a bad situation he had with iPhoto, some family videos had gone missing from his harddisk. The thumbnails were in iPhoto, but when he clicked on them, they wouldn't play because the files were gone. He had Time Machine backups, but they were gone even in the oldest copies. Apparently the files had been deleted quite a while ago.

This got me thinking about a huge problem with backups - you can be very diligent about keeping them, but if you have no idea that something's missing they don't do you much good.

What you need is something that would alert you of unexpected deletions. Thinking about my friend's experience, I whipped together a small shell script that would be run periodically to take an inventory of the iPhoto originals, and if something was removed compared to the last run, it would place a file on my desktop that hopefully I'd notice, listing a diff of the changes.

I saved this on my disk as /Users/barryp/bin/inventory_iphoto.sh

#!/bin/bash
#
# Check if anything has been deleted from the iPhoto Originals
# folder, and if so, place a file on the Desktop listing what's
# gone missing
#

CHECK_FILE=~/Library/Logs/com.diskcompare.inventory_iphoto.txt

find ~/Pictures/iPhoto\ Library/Originals -type f | sort >$CHECK_FILE.new
if [ -e $CHECK_FILE ]
then
    diff -u $CHECK_FILE $CHECK_FILE.new >$CHECK_FILE.diff
    grep '^-/' $CHECK_FILE.diff >$CHECK_FILE.gone
    if [ -s $CHECK_FILE.gone ]
    then
        mv $CHECK_FILE.diff "$HOME/Desktop/DELETED iPhoto files-`date "+%Y-%m-%d %H%M%S"`.txt"
    else
        rm $CHECK_FILE.diff
    fi
    rm $CHECK_FILE.gone
fi
mv $CHECK_FILE.new $CHECK_FILE

and made it executable with

chmod +x /Users/barryp/bin/inventory_iphoto.sh

Other than the directory name to check, there's nothing iPhoto or even Mac specific about this, it could be easily adapted for other uses.

You can run the script manually too anytime you want, and you can test this out by running once, editing ~/Library/Logs/com.diskcompare.inventory_iphoto.txt to add a line (starting with a /), and then running the script again to make sure a diff file pops up on your desktop showing how the line you manually added is gone in the updated inventory.

Next, I setup the Mac to run this once a day or so, by creating a launchd job saved as /Users/barryp/Library/LaunchAgents/com.diskcompare.inventory_iphoto.plist

<?xml version="1.0" encoding="UTF-8"?>
<!DOCTYPE plist PUBLIC "-//Apple//DTD PLIST 1.0//EN" "http://www.apple.com/DTDs/PropertyList-1.0.dtd">
<plist version="1.0">
<dict>
    <key>Label</key>
    <string>com.diskcompare.inventory_iphoto</string>
    <key>ProgramArguments</key>
    <array>
        <string>/Users/barryp/bin/inventory_photo.sh</string>
    </array>
    <key>StartInterval</key>
    <integer>86400</integer>
</dict>
</plist>

(You'll have to change the path to the script to suit your setup, unfortunately it doesn't seem you can use tilde expansion in a launchd job)

and then activated it in launchd with this command at the command prompt:

launchctl load ~/Library/LaunchAgents/com.diskcompare.inventory_iphoto.plist

Fortunately my friend found a really old harddisk that happened to have his missing videos on it, but he's even more lucky to have noticed the problem in the first place.

With a periodic inventory as described above, hopefully a person would become aware of a problem with in a day or two, in plenty of time get the files out of a backup system.

Make sure virtualization is enabled in the BIOS

I just wasted a fair amount of time on a RedHat 6.1 box being setup to be a hypervisor with KVM, trying to figure how why when I ran virsh version it was telling me among other things

internal error Cannot find suitable emulator for x86_64

All the appropriate packages such as qemu-kvm were installed, but it just didn't seem to want to work. Finally as I was about to try reinstalling RHEL, I remoted into the actual console and saw:

kvm: disabled by bios

Doh!, and looking back in /var/log/messages the same thing was buried deep within all the boot noise. While trying to figure this out I managed to just be looking for virt or qemu in the logs and somehow didn't search for kvm. Enabled virtualization in the BIOS and everything's gravy now.

So there you go, if you're Googling that first error message and get lots of other nonsense, look for the message about the BIOS.

iPXE on OpenBSD

I got a chance to try Enhanced PXE booting with iPXE on an OpenBSD box and found a couple things that don't work...

Firstly the stock DHCP daemon does not support if statements in the configuration, so this bit to keep iPXE from being told to load iPXE (a loop) didn't work

if exists user-class and option user-class = "iPXE" {
    filename "http://10.0.0.1/pxelinux.0";
    } 
else {
    filename "undionly.kpxe";
    }

To get it to work I had to follow the alternate advice on the chainloading documentation about Breaking the loop with an embedded script.

However, recompiling udnionly.kpxe on OpenBSD 4.9 failed, with the error:

net/fcels.c: In function 'fc_els_prli_detect':
net/fcels.c:1108: internal compiler error: Segmentation fault: 11
Please submit a full bug report,
with preprocessed source if appropriate.
See <URL:http://gcc.gnu.org/bugs.html> for instructions.
gmake: *** [bin/fcels.o] Error 1

(this was GCC 4.2.1). FreeBSD 8.2 also has the same version of GCC and comes up with the same error.

I ended up using an Ubuntu 10.04.3 box, which I believe was GCC 4.4.x, and that worked fine.

Automounting ISO images in FreeBSD

Since I've been playing with ISO images a lot lately (see posts tagged: pxe), I thought I'd take a look at making it easier to access their contents, since manually mounting and unmounting them gets to be a drag. It turns out than an Automounter is just what the doctor ordered - a service than will mount a filesystem on demand.

Typically, you'd see automounters mentioned in conjunction with physical CD drives, floppy drives, or NFS mounts - but the idea works just as well for ISO files. This way you can have available both the original ISO image and its contents - but without the contents taking up any additional space.

For FreeBSD, the amd utility will act as our automounter, on Linux systems amd is an option too, but another system called autofs seems to be widely used there - perhaps I'll take a look at that in another post.

Let's start with the desired end result ...

Directory Layout

On my home server I'd like to have this directory layout:

/data/iso/
    images/
        openbsd-4.9-i386.iso                    
        ubuntu-10.04.3-server-amd64.iso
        ubuntu-11.04-server-amd64.iso                    
            .
            .
            .

/data/iso/contents will be where the image contents will be accessible on-the-fly, by directory names based on the iso file names, for example:

/data/iso/
    contents/
        openbsd-4.9-i386/    
            4.9/
            TRANS.TBL
            etc/
        ubuntu-10.04.3-server-amd64/
            README.diskdefines
            cdromupgrade
            dists/
            doc/
            install/
            isolinux/
            md5sum.txt
            .
            .
            .
        ubuntu-11.04-server-amd64/             
        .
        .
        .

Mount/Unmount scripts

amd on FreeBSD doesn't deal directly with ISO files, so we need a couple very small shell scripts than can mount and unmount the images. Let's call the first one /local/iso_mount :

#!/bin/sh
mount -t cd9660 /dev/`mdconfig -f $1` $2

It does two things: first creating a md device based on the given iso filename (the first argument), and mounting the md device at the specified mountpoint (the second argument). Example usage might be:

/local/iso_mount /data/iso/images/ubuntu-11.04-server-amd64.iso /mnt

The second script we'll call /local/iso_unmount

#!/bin/sh
unit=`mdconfig -lv | grep $1 | cut -f 1`
num=`echo $unit | cut -d d -f 2`
umount /dev/$unit
sleep 10
mdconfig -d -u $num

It takes the same parameters as iso_mount. (the sleep call is a bit hackish, but the umount command seems a bit asychronous, and it doesn't seem you can destroy the md device immediately after umount returns - have to give the system a bit of time to finish with the device) To undo our test mount above would be:

/local/iso_unmount /data/iso/images/ubuntu-11.04-server-amd64.iso /mnt

amd Map File

amd is going to need a map file, so that when given a name of a directory that something is attempting to access, it can lookup a location of where to mount it from. For our needs, this can be a one-liner we'll save as /etc/amd.iso-file

*   type:=program;fs:=${autodir}/${key};mount:="/local/iso_mount /local/iso_mount /data/iso/images/${key}.iso ${fs}";unmount:="/local/iso_unmount /local/iso_unmount /data/iso/images/${key}.iso ${fs}"

A map file is a series of lines with

<key> <location>[,<location>,<location>,...]

In our case we've got the wildcard key *, so it'll apply to anything we try to access in /data/iso/contents/, and the location is a semicolon-separated series of directives. type:=program indicates we're specifying mount:= and unmount:= commands to handle this location. ${key} is expanded by amd to be the name of the directory we tried to access.

amd Config File

I decided to use a config file to set things up rather than doing it all as commandline flags, so this is my /etc/amd.conf file:

[ global ]
log_file = syslog

[ /data/iso/contents ]
map_name = /etc/amd.iso-file

Basically telling amd to watch the /data/iso/contents/ directory, and handle attempts to access it based on the map file /etc/amd.iso-file. Also set logging to go to syslog (typically you'd look in /var/log/messages)

Enable it and start

Added these lines to /etc/rc.conf

amd_enable="YES"
amd_flags="-F /etc/amd.conf"

Fire it up with:

service amd start

You should be in business. Unfortunately, if you try

ls /data/iso/contents

the directory will initially appear empty, but if you try

ls /data/iso/contents/openbsd-4.9-i386

you should see a listing of the image's top-level contents (assuming you have a /data/iso/images/openbsd-4.9-i386.iso file). Once an image has been automounted, you will see it in ls /data/iso/contents

Check the mount

If you try:

mount | grep amd

you'll probably seem something like:

/dev/md0 on /.amd_mnt/openbsd-4.9-i386 (cd9660, local, read-only)

The cool thing is, after a couple minutes of inactivity, the mount will go away, and /data/iso/contents will appear empty again.

Manually unmount

The amq utility lets you control the amd daemon, one possibility being to request an unmount to happen now, with for example:

amq -u /data/iso/contents/openbsd-4.9-i386

Conclusion

That's the basics. Now if you're setting up PXE booting and point your Nginx server for example to share /data/iso, you'll be able to reference files within the ISO images, and they'll be available as needed.
Enhanced PXE booting with iPXE

While doing more reading on PXE as a followup to Setting up a PXE environment for OS installations, I ran into iPXE, which has some interesting features which can simplify PXE booting. The main feature that caught my interest was HTTP support - meaning it can fetch various modules, kernels, etc from a web server, which in general is much more customizable and configurable than stock TFTP servers, and also much faster.

It took a while to figure out where it all fits into a boot stack, I thought I'd share what I've roughly figured out and gotten to work.

Stock PXE - a review

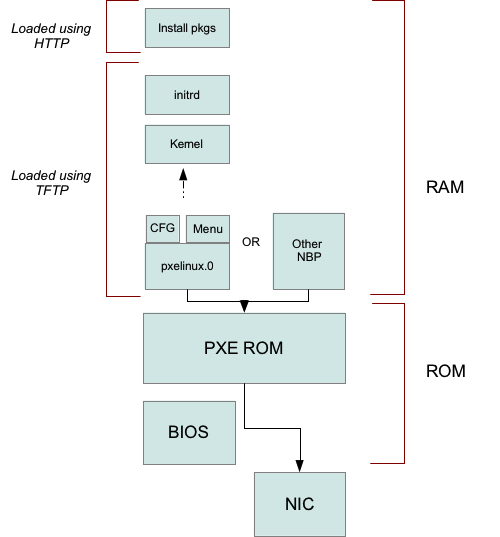
This diagram shows where we ended previously previously with installing Ubuntu over a network:

Stock PXE stack

The PXE stack would obtain from a DHCP server the IP address of a TFTP server and the name of a Network Boot Program (NBP) such as pxelinux.0

pxelinux.0 would then fetch a config file, and the config file fetched a menu module. Depending on what was selected from the menu, a Linux kernel and initrd could be fetched and booted, and then the Ubuntu installer presumably in the initrd would fetch additional install packages from an HTTP server.

Let's see what iPXE can do for us.

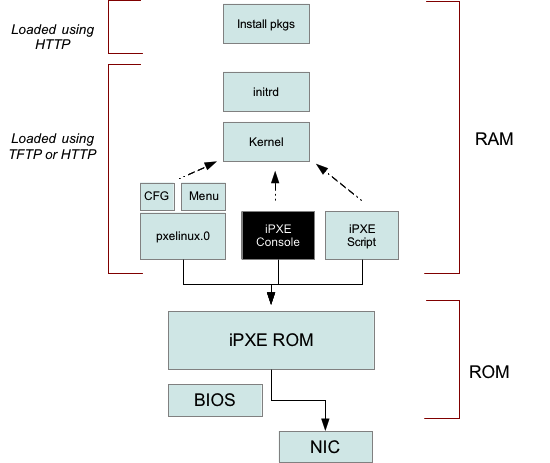
iPXE - replacement ROM

I didn't actually try this because it doesn't seem practical on a large scale, but you can on many NICs replace the stock PXE ROM with iPXE, giving you an arrangement like this:

iPXE ROM

A few things to note here:

  • We can now use HTTP to load our NBPs - it's just a matter of changing the DHCP config to say something like: filename "http://10.0.0.1/whatever"; (the next-server clause in the DHCP config doesn't really matter now)

  • We can use the same NBPs such as PXELINUX that worked in the stock PXE setup.

  • There's now an interactive console that lets you manually change settings and load modules including Linux kernels and ramdisks directly - so iPXE is also a bootloader itself and you don't necessarily need something like PXELINUX.

  • The same commands you can use interactively can be saved in script files, so essentially it's like having a NBP that's a text file instead of having to be a compiled binary.

As I mentioned, I don't think it's practical to go around flashing various NICs and motherboards, but there's another way to use iPXE....

Booting iPXE with PXE

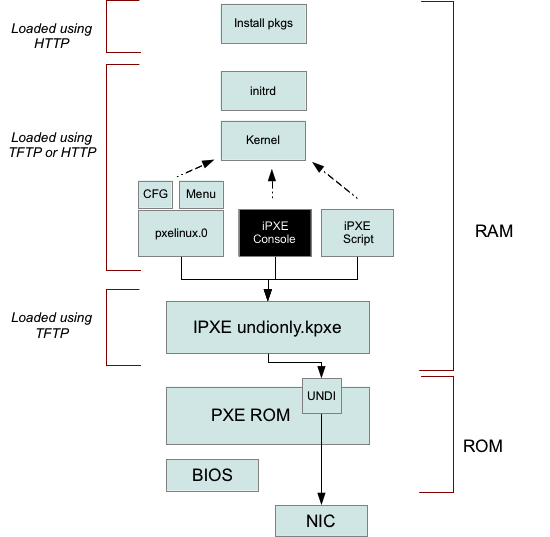
There's a version of iPXE that can be chainloaded, so that you're using the stock PXE on your machine to bring in the enhanced iPXE stack. Here's the big picture first:

PXE->iPXE

One of the APIs a PXE stack makes available is UNDI (Universal Network Device Interface), giving a simple device driver for the NIC that an NBP can use. We can configure DHCP to load undionly.kpxe as our initial NBP, it will use the UNDI part of the stock PXE ROM (so it doesn't need to be configured for any particular NIC), and it will start the PXE cycle again (querying the DHCP server for an IP address, the name of an NBP, etc...), but with all the extra features of iPXE available.

We need to use a bit of logic in the DHCP config so that the iPXE stack isn't also told to load undionly.kpxe (basically causing a loop). This can be done in ISC dhcpd with an if statement:

if exists user-class and option user-class = "iPXE" {
    filename "http://10.0.0.1/pxelinux.0";
    } 
else {
    filename "undionly.kpxe";
    }

So that plain PXE is told to (TFTP) load undionly.kpxe and iPXE is told to load http://10.0.0.1/pxelinux.0

One cool thing about this setup is that we only need to make one file available through TFTP, undionly.kpxe. Everything else can be served up by an HTTP server like Nginx. This is great because HTTP servers are generally more configurable than a stock TFTP server, plus you aren't limited to serving up static files - some of these requests from iPXE could be handled by CGI scripts or other webapps for more of a dynamic behavior.

PXELINUX on iPXE

If iPXE is the active PXE stack, then PXELINUX gains the ability to use HTTP urls for module names, for example, an Ubuntu install might point directly into a mounted ISO image shared on the web like:

LABEL ubuntu-11.04-server-amd64-install             
    MENU LABEL Ubuntu 11.04 Server AMD64 Install
    kernel http://10.0.0.1/ubuntu-11.04-server-amd64/install/netboot/ubuntu-installer/amd64/linux
    append vga=788 initrd=http://10.0.0.1/ubuntu-11.04-server-amd64/install/netboot/ubuntu-installer/amd64/initrd.gz url=http://10.0.0.1/ubuntu-11.04-server-amd64.txt

Conclusion

So, drop iPXE's undionly.kpxe into your TFTP server, configure DHCP to give it out as an NBP only if a non-iPXE stack is asking, and you can use HTTP for everything else.

Running Python WSGI apps with SCGI and inetd

Using scgi-inetd-wsgi

Previously, I wrote about running CGI Scripts with Nginx using SCGI with the help of a super-server such as inetd and a small C shim that takes a SCGI request from stdin and sets up a CGI enviroment.

There's also a companion project on GitHub for doing something similar with Python WSGI apps. The code works on Python 2.6 or higher (including Python 3.x). It can easily be patched for Python 2.5 or lower by with a simple string substitition mentioned in the source file

It's not something you'd want to run a frequently-accessed app with, because there'd be quite a bit of overhead launching a Python process to handle each request. It may be useful however for infrequently used apps where you don't want to have to keep and monitor a long-running process, or for development of a WSGI app where you don't want to have to stop/start a process everytime you make a change.

Let's take a look at a diagram to see what the flow will be:

SCGI<->WSGI

  1. Nginx opens a socket listened to by inetd
  2. inetd spawns a Python script with stdin and stdout connected to the accepted connection
  3. The Python script would import inetd_scgi and call its run_app function passing a WSGI app to actually handle the request. run_app will read the SCGI request from stdin, setup a WSGI enviroment, call the handler, and send the handler's response back to Nginx via stdout.

Here's how you'd wire up the Hello World app from PEP 3333

#!/usr/bin/env python
HELLO_WORLD = b"Hello world!\n"

def simple_app(environ, start_response):
    """Simplest possible application object"""
    status = '200 OK'
    response_headers = [('Content-type', 'text/plain')]
    start_response(status, response_headers)
    return [HELLO_WORLD]

if __name__ == '__main__':
    import inetd_scgi
    inetd_scgi.run_app(simple_app)

If you had saved that script as say /local/test.py, you might add this to /etc/inetd.conf to serve it up:

:www:www:200:/var/run/test.sock  stream   unix   nowait/4  www /local/test.py /local/test.py

and in Nginx with:

location /test {
    scgi_pass unix:/var/run/test.sock;
    include /usr/local/etc/nginx/scgi_params;
    fastcgi_split_path_info ^(/test)(.*);
    scgi_param  SCRIPT_NAME $fastcgi_script_name;
    scgi_param  PATH_INFO $fastcgi_path_info;
}    

Then, accessing http://localhost/test should show 'Hello world!'

AWStats under Nginx and SCGI

Earlier, I wrote about running CGI Scripts with Nginx using SCGI with the help of a small C shim. One particular CGI app I've had to alter slightly to work under this setup is AWStats, which is a decent-sized Perl app, but only requires one line added to satisfy SCGI's requirement of a Status line at the beginning of a response.

Here's a patch to AWStats 7.0

--- awstats.pl.original 2011-09-11 21:20:40.954555528 -0500
+++ awstats.pl  2011-03-31 00:19:35.867343845 -0500
@@ -750,6 +750,7 @@
 #------------------------------------------------------------------------------
 sub http_head {
        if ( !$HeaderHTTPSent ) {
+                print "Status: 200 OK\n";
                my $newpagecode = $PageCode ? $PageCode : "utf-8";
                if ( $BuildReportFormat eq 'xhtml' || $BuildReportFormat eq 'xml' ) {
                        print( $ENV{'HTTP_USER_AGENT'} =~ /MSIE|Googlebot/i