SNMP server not reporting disk size

I was setting up snmpd on an Ubuntu box, and noticed that it was reporting weird numbers for a couple of XFS filesystems I had setup for Minio.

An snmpwalk showed values like this:

HOST-RESOURCES-MIB::hrStorageType.51 = OID: HOST-RESOURCES-TYPES::hrStorageFixedDisk
HOST-RESOURCES-MIB::hrStorageType.52 = OID: HOST-RESOURCES-TYPES::hrStorageFixedDisk
...
HOST-RESOURCES-MIB::hrStorageDescr.51 = STRING: /minio/disk1
HOST-RESOURCES-MIB::hrStorageDescr.52 = STRING: /minio/disk2
...
HOST-RESOURCES-MIB::hrStorageAllocationUnits.51 = INTEGER: 0 Bytes
HOST-RESOURCES-MIB::hrStorageAllocationUnits.52 = INTEGER: 0 Bytes
...
HOST-RESOURCES-MIB::hrStorageSize.51 = INTEGER: 0
HOST-RESOURCES-MIB::hrStorageSize.52 = INTEGER: 0
...
HOST-RESOURCES-MIB::hrStorageUsed.51 = INTEGER: 0
HOST-RESOURCES-MIB::hrStorageUsed.52 = INTEGER: 0

So it was reporting the existence of the disks, but with all 0 values. The root ext4 filesystem showed up fine, was it something to do with XFS?

Turns out the answer was NO, it was the permissions of the /minio directory that the filesystems were mounted under. I figured this out when I noticed that df -h showed the disks when I was running as root

/dev/sdb1        60G  461M   60G   1% /minio/disk1
/dev/sdc1        60G  461M   60G   1% /minio/disk2

But when running as non-root, such as the Debian-snmp user, df -h didn't show the disks at all.

Turns out I had been too strict with the permissions on /minio, I had originally set that to

drwx------   4 minio-user root       4096 Feb 14 14:57 minio

But that apparently, and to my surprise, prevented snmpd from being able to read the size and usage information for the mounts under that directory. Changing that to 0755 fixed the problem, and I just made sure that the mountpoints had more strict permissions

drwxr-x--- 3 minio-user root 24 Feb 27 13:08 disk1
drwxr-x--- 3 minio-user root 24 Feb 27 13:08 disk2

Proxmox NIC pass-through and machine type

I picked up a little Topton fanless server a while back, that comes with 4 x 2.5Gb Intel i226 NICs, and wanted to try running an OpenBSD VM on Proxmox with NIC pass-through. There are some fairly detailed instructions on servethehome.com, but one important thing I found they left out was the Proxmox "Machine" setting.

The default seems to be "i440fx", and with that default I was sort of seeing the NIC inside OpenBSD, but with dmesg entries like:

igc0 at pci0 dev 16 function 0 "Intel I226-V" rev 0x04: not enough msi-x vectors
igc0: unable to map msi-x vector 0

and the interface wouldn't actually show up in ifconfig

After finally finding some hints on the web that the q35 machine type adds PCIe support, I gave that a try and now the igc0 interface on OpenBSD seems to be working!

UFW and LXC/LXD on Ubuntu 22.04

I recently setup a new Ubuntu server with LXC containers. At first it all went great, but then later when I enabled UFW, things got flaky. Looking at /var/log/syslog I saw UFW was blocking lots of traffic from inside the containers.

Also when restarting a container, the container wouldn't get one of the bridged 10.x.x.x IP addresses.

After Googling a bit, I found the magic commmands on this discussion:

ufw allow in on lxdbr0
ufw route allow in on lxdbr0

In hindsight, I think it would have been better to enable ufw before doing anything else with the new install, that way the problems would have been more obvious right away - rather than it being a "geez, it was working before" type situation.

RancherOS/ISOLinux/Syslinux on FreeBSD bhyve

After messing with Docker on my laptop, I thought it would be interesting to setup a VM on my FreeBSD server to run RancherOS. I've been using vm-bhyve to manage the VMs, and have been running Ubuntu without much problem, so I figured another Linux distro would be fine ... but ended up opening a whole can of worms and while I did get it running eventually, I learned more about grub and booting on bhyve than I really wanted.
I thought I'd jot down some notes here for future reference.

To start with, bhyve is not a general hypervisor that can boot any PC-compatible disk or CD image you throw at it, the way something like KVM, VMWare, or Parallels can. It doesn't start a VM in 16-bit mode and go through an old-school BIOS boot sequence where it reads a Master Boot Record and executes whatever's there. It knows how to load a FreeBSD kernel, and with grub2-bhyve it can boot disks and CDs that use Grub2 - such as Ubuntu.

Unfortunately, RancherOS doesn't use grub, instead it uses Syslinux/ISOLinux on their ISO images and harddisk installations. When bhyve boots using the grub loader, it doesn't find any grub menu on the disk, and just drops you into a grub command prompt.

GNU GRUB  version 2.00

Minimal BASH-like line editing is supported. For the first word, TAB
lists possible command completions. Anywhere else TAB lists possible
device or file completions.

grub>

Fortunately, the grub commandline is like a mini-os, with lots of abilities to look around the disks, and it turns out manually boot things like RancherOS.

The first command to run is:

set pager=1

so that future commands don't just scroll off the screen.

help

displays a list of commands, help <command> gives a short explanation. ls lets you start poking around, in this case giving:

(cd0) (cd0,msdos1) (host)

Now we're getting somewhere. Trying ls (cd0) gives

Device cd0: Filesystem type iso9660 - Label `RancherOS' - Last modification time 2018-09-19 03:09:12 Wednesday, UUID 2018-09-19-03-09-12-00 - Total size 176128 sectors

ls -l (cd0)/ gives

DIR          20180919030909 boot/
DIR          20180919030912 rancheros/

OK, a boot directory, getting closer. ls -l (cd0)/boot gives

170          20180919030909 global.cfg
66978212     20180919030909 initrd-v1.4.1
DIR          20180919030909 isolinux/
1373         20180919030909 linux-current.cfg
12734        20180919030909 rancher.png
5523216      20180919030909 vmlinuz-4.14.67-rancher2

There we go, isolinux, but no grub files, no wonder it doesn't boot. After lots and lots of messing around learning grub, I was able to get an initial boot of the CD image from the grub> prompt with:

linux (cd0)/boot/vmlinuz-4.14.67-rancher2
initrd (cd0)/boot/initrd-v1.4.1
boot

And it started! After lots of Linux boot output I was rewarded with:

                ,        , ______                 _                 _____ _____TM
   ,------------|'------'| | ___ \               | |               /  _  /  ___|
  / .           '-'    |-  | |_/ /__ _ _ __   ___| |__   ___ _ __  | | | \ '--.
  \/|             |    |   |    // _' | '_ \ / __| '_ \ / _ \ '__' | | | |'--. \
    |   .________.'----'   | |\ \ (_| | | | | (__| | | |  __/ |    | \_/ /\__/ /
    |   |        |   |     \_| \_\__,_|_| |_|\___|_| |_|\___|_|     \___/\____/
    \___/        \___/     Linux 4.14.67-rancher2

    RancherOS #1 SMP Thu Sep 13 15:37:04 UTC 2018 rancher ttyS0
    docker-sys: 172.18.42.1 eth0: 10.66.0.48 lo: 127.0.0.1
rancher login:

Very cool, but what's the login? Userid is rancher, but there is no default password. According to the rancher docs, the ISO image is supposed to auto-login. Now what?

After rebooting and getting back to the grub> prompt, and digging around more, I found that cat (cd0)/boot/global.cfg showed:

APPEND rancher.autologin=tty1 rancher.autologin=ttyS0 rancher.autologin=ttyS1 rancher.autologin=ttyS1 console=tty1 console=ttyS0 console=ttyS1 printk.devkmsg=on panic=10

Ah, LInux command parameters including autologin stuff. To apply them it ended up being (again at the grub> prompt):

linux (cd0)/boot/vmlinuz-4.14.67-rancher2 rancher.autologin=tty1 rancher.autologin=ttyS0 rancher.autologin=ttyS1 rancher.autologin=ttyS1 console=tty1 console=ttyS0 console=ttyS1 printk.devkmsg=on panic=10
initrd (cd0)/boot/initrd-v1.4.1
boot

(that commandline could probably be simplified since we can see from the banner that our VM console is ttyS0, so we probably don't need the params relating to tty1 or ttyS1) This time I got the cattle banner from above, and a beautiful:

Autologin default
[rancher@rancher ~]$

A simple sudo -s (not requiring a password) gives root access. At that point you can do whatever, including installing onto a harddisk.

To get a RancherOS harddisk installation to boot, you'd have to go through similar steps with grub in exploring around the (hd0,1) disk to find the kernel, initrd, and kernel params. The grub commands for booting can be saved permanently in the vm-bhyve config for this machine with grub_runX lines like:

grub_run0="linux (hd0,1)/boot/vmlinuz-4.14.67-rancher2 rancher.autologin=ttyS0 printk.devkmsg=on rancher.state.dev=LABEL=RANCHER_STATE rancher.state.wait panic=10 console=tty0"
grub_run1="initrd (hd0,1)/boot/initrd-v1.4.1"
grub_run2="boot"

So the full vm-bhyve config file looks like (in case you're wondering - I hate it when people give snippets of code but don't show where it should go exactly):

loader="grub"
grub_run0="linux (hd0,1)/boot/vmlinuz-4.14.67-rancher2 rancher.autologin=ttyS0 printk.devkmsg=on rancher.state.dev=LABEL=RANCHER_STATE rancher.state.wait panic=10 console=tty0"
grub_run1="initrd (hd0,1)/boot/initrd-v1.4.1"
grub_run2="boot"
cpu=2
memory=2048M
network0_type="virtio-net"
network0_switch="public"
disk0_type="virtio-blk"
disk0_name="disk0"
disk0_dev="sparse-zvol"
uuid="7f9fc9e5-c835-11e8-a327-e03f49af0c7d"
network0_mac="58:9c:fc:05:2a:04"

With that, my VM now boots without manual intervention, even though the virtual disk doesn't use grub.

Winbind failure do to incorrect time

I had the weirdest thing suddenly start happening last night that took several hours to finally figure out was a time-related issue.

I've got an Ubuntu box that uses pam_winbind to allow for logging into a machine using an Active Directory account.
Normally I connect with an SSH key, but once in when doing sudo -s I enter an AD password to become root. Last night that sudo -s suddenly stopped working.

Luckily I had another non-AD account that I could connect with, and sudo worked for that, so I could become root and poke around. The logs showed:

sudo: pam_unix(sudo:auth): authentication failure; logname=barry.pederson uid=14283 euid=0 tty=/dev/pts/0 ruser=barry.pederson rhost=  user=barry.pederson
sudo: pam_unix(sudo:auth): conversation failed
sudo: pam_unix(sudo:auth): auth could not identify password for [barry.pederson]

That was weird, I could log into other things though that used the same AD account, so I knew the password was right and the account wasn't locked out.

I hoped by the next morning, some cache thing would expire and I'd be back in business, but no dice.

Poking around some more I found if I disabled my SSH keys, I couldn't log in at all, so it was really a pam_winbind issue, not a sudo one. The logs for a SSH password login attempt were a bit more informative:

pam_unix(sshd:auth): authentication failure; logname= uid=0 euid=0 tty=ssh ruser= rhost=xxx.yyy.zzz  user=barry.pederson
pam_winbind(sshd:auth): getting password (0x00000388)
pam_winbind(sshd:auth): pam_get_item returned a password
pam_winbind(sshd:auth): request wbcLogonUser failed: WBC_ERR_AUTH_ERROR, PAM error: PAM_AUTH_ERR (7), NTSTATUS: NT_STATUS_LOGON_FAILURE, Error message was: Logon failure
pam_winbind(sshd:auth): user 'barry.pederson' denied access (incorrect password or invalid membership)
Failed password for barry.pederson from x.x.x.x port 50655 ssh2

WTF? I know the password's right, I've been typing it all morning into other systems. I even tried wbinfo --authenticate barry.pederson on this box and it accepted my passwords.

Much time was spent Googling, trying various tweaks to smb.conf, etc. Finally, I don't remember why, I thought to check the date with ntpdate -d my.ad.server and it came back with offset -338.308573 sec. Holy crap, that's more than 5 minutes! Even though ntpd is running.

Anyhow, once the clock was fixed to be closer to the AD server, logins and sudo started working again.

Integrated Windows Authentication with Apache on a Linux box

Integrated Windows Authentication (IWA) is a useful feature for intranets, where a web browser on a Windows client joined to Active Directory (AD) can seamlessly pass authentication information to a web server - without needing to prompt the user for a password. It's supported by IE, Firefox and Chrome on the client side, and naturally by IIS on the server side. With just a little bit of effort, it can also be supported by Apache on a Linux or other Unix-type OS, and I'll take a look at doing that here.

IWA is a generic term that covers a few different protocols. One is the older NTLM Authentication, which can be setup on a Linux server with mod_auth_ntlm_winbind, but that's awfully clunky and requires setting up and running Samba's winbindd daemon. Another is Kerberos, which is fairly well supported in must Linux/Unix distros, and is an integral part of Active Directory.

There are a lot of writeups on integrating a Linux box with AD, but most of them get very complicated, trying to integrate everything, including login, file sharing, group mapping, etc. And deeply relying on Samba. I'm going to focus on just the one simple task of HTTP authentication in Apache, not using Samba, and being as explicit as possible on what needs to be done on both the Linux and Windows Active Directory sides of the setup.

Prerequisites

I'm going to do this for Ubuntu 10.04 and assume you have root access and are familiar with general Apache configuration. Other Linux distros or perhaps BSDs should be very very similar.

Some other things you're going to need to be able to do, or at least get someone in you organization to do for you are:

  • Create an AD User object
  • Run the setspn and ktpass Windows commandline utilities against the User object you create
  • Setup forward and corresponding reverse DNS records for your server.

Examples

For the rest of this, we're going to assume:

  • AD Domain name = ad.foobar.edu
  • AD Kerberos Realm = AD.FOOBAR.EDU (usually the domain-name uppercased)
  • Our Linux box's domain name = test.foobar.edu
  • Linux box's IP = 1.2.3.4
  • Reverse lookup of 1.2.3.4 results in test.foobar.edu

AD Setup

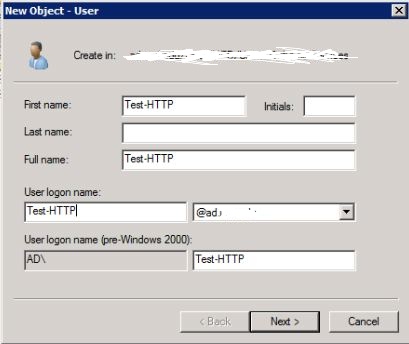
Firstly, we need a User object in Active Directory that will represent the Apache service, and will hold a password which Kerberos tickets will be based on.

In the Active Directory Users and Computers utility, create a User object, the name doesn't matter much, so I'll go with Test-HTTP

User object creation

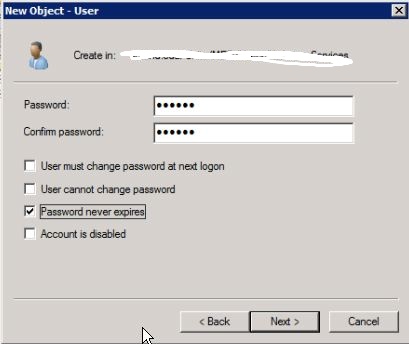
after hitting Next >, on the password page uncheck User must change password... and check Password never expires. Go ahead and enter anything as a password, it'll get changed to something random in a later step.

User object password

Go ahead and finish that up.

Next, we need to associate a Service Principal Name (SPN) with the User object we just created. Kerberos principals are usually <protocol>/<domain-name>@<kerberos-realm>. Since we're doing a web server, it'll be known in Kerberos as HTTP/test.foobar.edu@AD.FOOBAR.EDU Run this in a Command Prompt window:

setspn -A HTTP/test.foobar.edu Test-HTTP

(note that we left off the @AD.FOOBAR.EDU part, setspn knows to put that in)

Lastly, we're going to create a keytab file (I'll call it test-http.keytab), which holds encryption keys based on the User object's password. When a client requests a ticket to access our Linux box, AD will locate the User object based on the SPN we associated with it, and use the same encryption keys to create the Kerberos tickets our Linux's Apache will be setup to require.

(This is a one-line command, but I'm going to display it below as several lines for readability)

ktpass -out test-http.keytab 
    -princ HTTP/test.foobar.edu@AD.FOOBAR.EDU 
    -mapuser Test-HTTP 
    -mapOp set 
    +rndPass 
    -crypto All 
    -ptype KRB5_NT_PRINCIPAL

The +rndPass changes the User objects password to something random, you don't need to know what it is - the keytab is the thing you really care about here.

Securely copy that test-http.keytab to the Linux box, and delete it off the Windows machine. We're done with AD now, back to the real world...

Linux setup

Move the keytab file somewhere handy, such as /etc/apache2/test-http.keytab, and set the permissions so that the Apache process (and nobody else) has access:

chmod 440 test-http.keytab
chown www-data:www-data test-http.keytab

Install the Apache Kerberos module

aptitude install libapache2-mod-auth-kerb

You'll need an /etc/krb5.conf file. A simple one that leaves it up to Kerberos to discover what it needs might be as simple as:

[libdefaults]
default_realm = AD.FOOBAR.EDU

Here's a more explicit one that specifies Active Directory KDCs (Key Distrubution Centers), by IP

[libdefaults]
default_realm = AD.FOOBAR.EDU
default_keytab_name = FILE:/etc/krb5.keytab

[realms]
AD.FOOBAR.EDU = {
    kdc = 1.2.0.1
    kdc = 1.2.0.2
    kdc = 1.2.0.3
    default_domain = AD.FOOBAR.EDU
    }

[domain_realm]
.foobar.edu = AD.FOOBAR.EDU

That sort of thing is documented on the MIT website.

Apache Setup

We're in the home stretch now, Apache directives to protect a cgi-bin directory for example might look like:

ScriptAlias /cgi-bin/ /usr/lib/cgi-bin/
<Directory "/usr/lib/cgi-bin">
    AllowOverride None
    Options +ExecCGI -MultiViews +SymLinksIfOwnerMatch
    Order allow,deny
    Allow from all

    AuthName "FOOBAR Active Directory"
    AuthType KerberosV5
    KrbServiceName HTTP
    Krb5Keytab /etc/apache2/test-http.keytab
    require valid-user
</Directory>

Those last 5 lines inside the <Directory> block are the key here. The KrbServiceName of HTTP corresponds to what we entered as the protocol part of the principal name back on the setspn and ktpass commands. The AuthName is what will be displayed if the browser falls back to basic autentication if Kerberos is not available.

Test it out

Here's a super-simple CGI test.sh script we can put in our Kerberos-protected cgi-bin directory, be sure to make it executable.

#!/bin/sh
echo 'Content-Type: text/plain' 
echo
echo You are: $REMOTE_USER

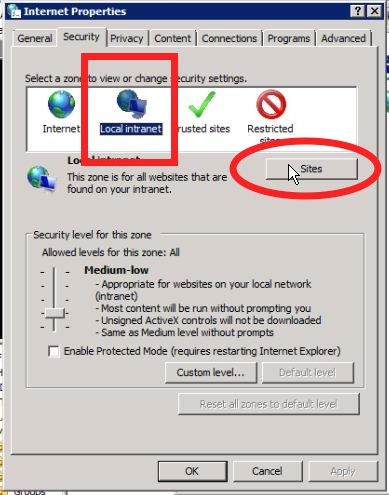
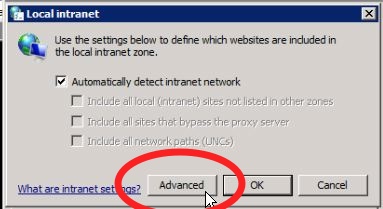
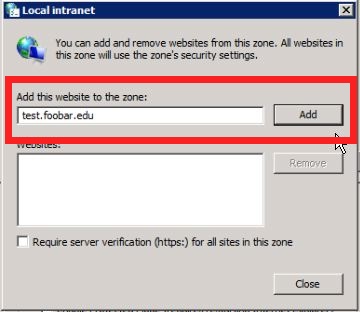
Go to a Windows client signed into Active Directory. To get IE or Chrome to attempt Kerberos authentication you'll have to add test.foobar.edu to the Local Intranet in the Internet Settings control panel. Here are some shots of where to go:

Local Intranet screenshot 1

Local Intranet screenshot 1

Local Intranet screenshot 1

For Firefox, you'll want the NTLMAuth add-in, which lets you specify which domains that Firefox should attempt Kerberos authentication with.

Once you've got the browser fixed up, try accessing http://test.foobar.edu/cgi-bin/test.sh, and if everything works out, you should be rewarded with something like:

You are: bob.smith@AD.UND.EDU

If you didn't follow the steps to configure the browser to attempt Kerberos auth with the site, the browser should pop-up a userid/password box, and if you enter the correct info, it should show the same info.

Conclusion

So there you have it, after 15 minutes of work you can now have a webpage tell you what your own AD userid is. OK, it's probably more useful than that - you can now write webapps proxied behind Apache, such as a Django app, that just have to look at the REMOTE_USER variable to tell who's on the other end of the connection.

You'll probably not want to require Kerberos auth for the whole app, but all you really need is to require Kerberos for one particular login URL that sets your userid into a session, and leave it up to the framework to check the session for authentication on the rest of the site.

Debian GNU/kFreeBSD in a FreeBSD Jail - part 2

Previously I wrote about getting Debian GNU/kFreeBSD working in a jail. I've worked on it a bit more, polishing things up so I've got it working pretty seamlessly with my existing ezjail FreeBSD jails, so everything starts automatically, and you can use the ezjail commands to stop/restart the jail.

Here are a few more notes about how things got setup for my jail I named debian:

Kernel Modules

In /boot/loader.conf, I added these lines:

fdescfs_load="YES"
linprocfs_load="YES"
linsysfs_load="YES"
tmpfs_load="YES"

Mounting Filesystems

Created /etc/fstab.debian and populated with:

linproc     /jails/debian/proc      linprocfs       rw 0 0
linsys      /jails/debian/sys       linsysfs        rw 0 0
tmpfs       /jails/debian/lib/init/rw   tmpfs       rw 0 0

ezjail Config

Created /usr/local/etc/ezjail/debian with these contents:

export jail_debian_hostname="debian"
export jail_debian_ip="127.0.0.6"
export jail_debian_interface="lo0"
export jail_debian_rootdir="/jails/debian"
export jail_debian_mount_enable="YES"
export jail_debian_devfs_enable="YES"
export jail_debian_devfs_ruleset="devfsrules_jail"
export jail_debian_fdescfs_enable="YES"
export jail_debian_exec_start="/etc/init.d/rc 3"
export jail_debian_flags="-l -u root"

I also tried adding an IPv6 address to the jail, and that seems to work OK

So you can now stop/start with jail with

service ezjail.sh stop debian
service ezjail.sh start debian

Connect to the jail console

If you create a symlink for login (so that from the jail's POV there's a /usr/bin/login, like there would be on a FreeBSD jail)

cd /jails/debian/usr/bin/
ln -s ../../bin/login .

then you can use the ezjail-admin command to get a console in the jail, with:

ezjail-admin console debian

Otherwise, I've been using my own script to get a console (which assumes bash is installed in the jail), named /usr/local/sbin/jlogin

#!/bin/sh
#
# log into a jail, running bash
#
JID=`jls | grep " $1 " | awk '{print $1}'`
exec jexec $JID env -i PATH=/sbin:/bin:/usr/sbin:/usr/bin:/usr/local/sbin:/usr/local/bin TERM=$TERM EDITOR=$EDITOR LANG=$LANG HOME=/root bash -l

That runs as:

jlogin debian

Debian GNU/kFreeBSD in a FreeBSD Jail

I've been a FreeBSD user for quite some time, going back to 3.3 or so, and for the last serveral years have also been working a lot with Ubuntu Linux. So when I ran across Debian GNU/kFreeBSD, which provides a Debian environment on top of a FreeBSD kernel, I was somewhat intrigued. It got even more interesting when I found a tutorial on setting up GNU/kFreeBSD in a jail. The notion of having a Debian environment on my home FreeBSD server without having to get something like VirtualBox running was just too good to pass up.

I got it running fairly decently, but along the way ran into some small problems - and thought I'd jot down what they were and what the fixes were.

FreeBSD Update

At first, I was using FreeBSD 8.2-RELEASE, and used debootstrap to install Debian Squeeze, as the tutorial showed. Once inside the jail, things sort of worked, but most commands, aptitude especially, would die with:

User defined signal 1

It turns out you need a newer kernel than 8.2 to run kFreeBSD in a chroot, as is mentioned in the FAQ. I upgraded my FreeBSD kernel/world to 8.3-PRERELEASE (2012-02-22), and the "signal 1" problem went away.

Debian Update

The next problem was that aptitude would still die, with:

Uncaught exception: Unable to read from stdin: Operation not permitted

After reading about this bug in cwidget, it seemed an upgrade to Wheezy was needed to fix the problem - and sure enough that problem went away.

kbdcontrol and /dev/console

The upgrade to Wheezy didn't go entirely smoothly, mainly due to the kbdcontrol package (required by sysvinit) being unable to access /dev/console in the jail. I wasn't worried about keeping things in the jail isolated for security reasons, so I went ahead and added /dev/console on-the-fly to the running jail by running outside the jail:

devfs -m /jails/debian/dev rule add path 'console*' unhide
devfs -m /jails/debian/dev rule applyset

After that, the kbdcontrol package was able to be upgraded, and I seem to have a Wheezy FreeBSD jail now. Very cool.

UPDATE: A followup talks more about the actual file changes made to run as an ezjail

VM Serial Console part 2

Fooling around a bit more with accessing a VM's serial console from a KVM hypervisor with

virsh console mymachine

I found one thing that doesn't carry over from the host to the VM is the terminal window size, so if you try to use something like vim through the console connection, it seems to assume a 80x25 or so window, and when vim exits your console is all screwed up.

It looks like a serial connection doesn't have an out-of-band way of passing that info the way telnet or ssh does, so you have set it manually. You can discover your settings on the host machine with

stty size

which should show something like:

60 142

on the VM, the same command probably shows

0 0

zero rows and columns, no wonder it's confused. Fix it by setting the VM to have the same rows and columns as the host with something like:

stty rows 60 columns 142

and you're in business.

Enabling VM serial console on stock Ubuntu 10.04 server

So I've been running Ubuntu 10.04 server virtual machines on a host running KVM as the hypervisor, and thought I should take a look at accessing the VM's console from the host, in case there's a problem with the networking on the VM.

The hosts's VM libvirt definition shows a serial port and console defined with

<serial type='pty'>
  <source path='/dev/pts/1'/>
  <target port='0'/>
  <alias name='serial0'/>
</serial>
<console type='pty' tty='/dev/pts/1'>
  <source path='/dev/pts/1'/>
  <target type='serial' port='0'/>
  <alias name='serial0'/>
</console>

and within the stock Ubuntu 10.04 server VM, dmesg | grep ttyS0 shows:

[    0.174722] serial8250: ttyS0 at I/O 0x3f8 (irq = 4) is a 16550A
[    0.175027] 00:05: ttyS0 at I/O 0x3f8 (irq = 4) is a 16550A

So the virtual hardware is all setup on both ends, but ps aux | grep ttyS0 doesn't show anything

We need to have a process listening to that port. To do that, create a file named /etc/init/ttyS0.conf with these contents:

# ttyS0 - getty
#
# This service maintains a getty on ttyS0 from the point the system is
# started until it is shut down again.

start on stopped rc RUNLEVEL=[2345]
stop on runlevel [!2345]

respawn
exec /sbin/getty -L 38400 ttyS0 xterm-color

and then run

initctl start ttyS0

back in the host machine run virsh list to find the name or id number of your VM, and then

virsh console <your-vm-name-or-number>

to connect, hit return and you should see a login prompt.