If you're fooling around with various OSes, installing them by
first burning CDs or DVDs gets to be a drag - and you end up with piles of old
discs that just go into a landfill. Sure, there are rewritable disks,
but they wear out and get scratched eventually. USB memsticks can be
painful too - sometimes difficult to create and with different BIOSes
having different levels of support.
A slick way to go is to set yourself up to do PXE (Preboot
eXecution Environment) installations over a network. Most network cards
have had PXE support included for many years now. If you have a
machine handy that can act as a simple server, you can have an
enviroment where you boot a machine, select the OS you want to install
from a menu, and everything will just be pulled over your local network.
There are plenty of writeups on how to PXE install Ubuntu from an Ubuntu
server, or FreeBSD from a FreeBSD server - but to make things more
interesting and explicit I'll go cross-platform and talk about deploying
Ubuntu Server 11.04 from a FreeBSD 8.2 server, and try to make it general
enough so that later on we can add other OSes to the menu such as CentOS
or OpenBSD.
Requirements
PXE booting a machine requires two basic services be present on your
network:
-
DHCP - to assign the booted machine an IP address and tell it what
"network bootstrap program" (NBP) to fetch from a TFTP server
-
TFTP (Trivial FTP - not to be confused with regular FTP)
serves up the initial boot files
OSes such as Ubuntu or CentOS require a third service:
- HTTP Server - serves up the bulk of the OS install files.
PXELINUX
For the Network Bootstram Program, we'll use PXELINUX, which
is available as part of the SYSLINUX project. The name
SYSLINUX is a bit misleading in that it's not actually Linux, but rather
a collection of bootloaders that are often used with Linux, and capable
of loading other OSes as well. Think of something more along the lines
of GRUB, than an actual Linux distro.
To start off with, I'll create a /tftpboot directory, download
syslinux-4.04.tar.gz from here, extract and
copy two files we want:
mkdir /tftpboot
fetch http://www.kernel.org/pub/linux/utils/boot/syslinux/syslinux-4.04.tar.gz
tar xzvf syslinux-4.04.tar.gz
cp syslinux-4.04/core/pxelinux.0 /tftpboot
cp syslinux-4.04/com32/menu/menu.c32 /tftpboot
We're done with the syslinux download now, so you could clean it up
if you want with:
rm -rf syslinux-4.04*
Next, create a configuration directory
mkdir /tftpboot/pxelinux.cfg
and in that directory create a file named default with these initial
contents:
DEFAULT menu.c32
PROMPT 0
TIMEOUT 200

LABEL local
    MENU LABEL Local Boot
    LOCALBOOT 0
That should be enough to get us a barebones menu when we PXE boot a
machine, with a single option to boot off the local harddisk (we'll get
to Ubuntu later).
Enable TFTP
TFTP is already included in FreeBSD, just need to make sure it's enabled.
In /etc/inetd.conf make sure this line has the default # removed from the
front (so it's not commented out)
tftp dgram udp wait root /usr/libexec/tftpd tftpd -l -s /tftpboot
In /etc/rc.conf, make sure inetd is enabled, adding if necessary:
inetd_enable="YES"
Depending on what you had to do above, start, or reload the inetd daemon
with:
service inetd start
or
service inetd reload
Check that the machine is now listing on UDP port 69
sockstat | grep :69
See if you can fetch the NBP using the tftp utility (assuming your
server's IPv4 address on the network you'll be doing PXE boots is
10.0.0.1)
cd /tmp
tftp 10.0.0.1
tftp> get /pxelinux.0
tftp> quit
rm pxelinux.0
If it works you should have seen somthing like:
Received 26443 bytes during 0.1 seconds in 53 blocks
Tweak DHCP Server
For this part I'm assuming you're running an ISC dhcpd server (if not,
we'll have to cover that in another post). You basically just need to
add two lines to /usr/local/etc/dhcpd.conf telling a client what
server to use for TFTP and what NBP to fetch:
next-server 10.0.0.1;
filename "/pxelinux.0";
On my server, I just wanted to do this on one particular subnet, so
there's a chunk that looks something like this now:
subnet 10.0.0.0 netmask 255.255.255.0
    {
    range 10.0.0.127 10.0.0.250;
    option routers 10.0.0.1;

    next-server 10.0.0.1;
    filename "/pxelinux.0";
    }
Restart dhcpd
service isc-dhcpd restart
Give it a try
On your client machine, you may have to poke around in the BIOS to
enable PXE booting. You'll have to figure out this part for yourself.
If you can select your Network Card as the boot device, and everything
else is working right, you should see a simple menu something like this:

OK! we're at the "Hello World" stage, we know the client and server are
doing the bare minimum necessary for PXE to function at all. Time to
move on to the good stuff.
Ubuntu Server 11.04
For this next step, I'll assume you've downloaded an ISO into say
/foo/ubuntu-11.04-server-amd64.iso The specific version shouldn't matter too
much, so if you want to do 10.04 LTS or something else, it should all be
about the same.
Mount the ISO image, so we can copy a couple files into /tftpboot and
share the rest with a web server.
mkdir -P /iso_images/ubuntu-11.04-server-amd64
mount -t cd9660 /dev/`mdconfig -f /foo/ubuntu-11.04-server-amd64.iso` /iso_images/ubuntu-11.04-server-amd64
mkdir /tftpboot/ubuntu-11.04-server-amd64
cp /iso_images/ubuntu-11.04-server-amd64/install/netboot/ubuntu-installer/amd64/linux /tftpboot/ubuntu-11.04-server-amd64
cp /iso_images/ubuntu-11.04-server-amd64/install/netboot/ubuntu-installer/amd64/initrd.gz /tftpboot/ubuntu-11.04-server-amd64
So now our /tftpboot directory has these five files underneath it:
pxelinux.0
pxelinux.cfg/default
menu.c32
ubuntu-11.04-server-amd64/linux
ubuntu-11.04-server-amd64/initrd.gz
To the /tftpboot/pxelinux.cfg/default file append
LABEL ubuntu-11.04-server-amd64-install
    MENU LABEL Ubuntu 11.04 Server AMD64 Install
    kernel ubuntu-11.04-server-amd64/linux
    append vga=788 initrd=ubuntu-11.04-server-amd64/initrd.gz
Try PXE booting your client again, this time you'll have
"Ubuntu 11.04 Server AMD64 Install" as one of your choices, select that,
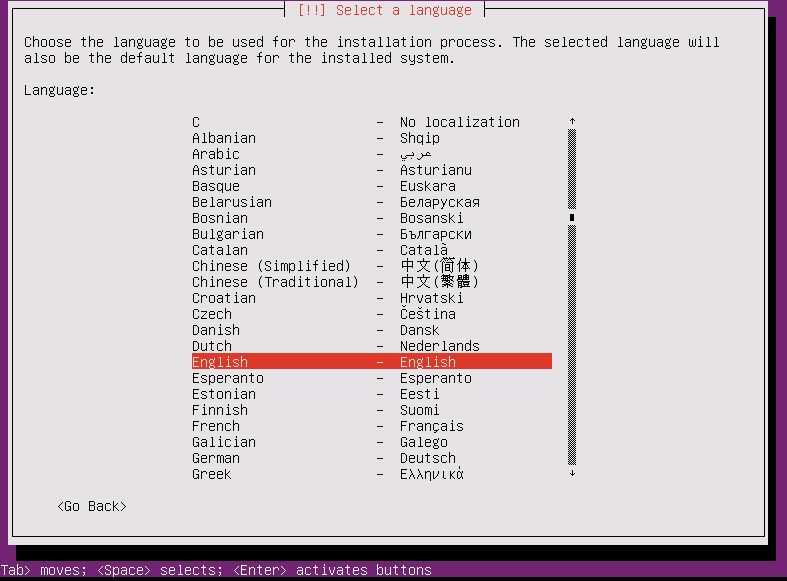
cross your fingers, and if all goes well in a few seconds you should see:

and you can go through and answer the initial questions about the install.
If you're OK with pulling the bulk of the OS over the internet from the
official Ubuntu mirrors, it should work although it might be slow.
Since we have a nice server sitting on our LAN with a copy of the ISO,
we should setup to use that and do a much faster install.
Web Server
For this example, I'll assume nginx has been installed as the webserver
(any one will do though, so if you've already got apache installed - that'll
work fine too).
The default nginx install uses /usr/local/www/nginx as its docroot, lets
put a symlink to our mounted ISO image in there:
ln -s /iso_images/ubuntu-11.04-server-amd64 /usr/local/www/nginx
and also put in a minimal Debian Installer "preseed" file in there that'll
help things along by telling the installer to use our webserver for
the installation packages. Create a text file named /usr/local/www/nginx/ubuntu-11.04-server-amd64.txt with these contents:
d-i mirror/country string manual
d-i mirror/http/hostname string 10.0.0.1
d-i mirror/http/directory string /ubuntu-11.04-server-amd64
d-i mirror/http/proxy string
Check that you can fetch that file with the URL: http://10.0.0.1/ubuntu-11.04-server-amd64.txt
Edit the /tftpboot/pxelinux.cfg/default file and append
url=http://10.66.0.1/ubuntu-11.04-server-amd64.txt
to the end of the append line of our Ubuntu section, so it now looks like:
LABEL ubuntu-11.04-server-amd64-install
    MENU LABEL Ubuntu 11.04 Server AMD64 Install
    kernel ubuntu-11.04-server-amd64/linux
    append vga=788 initrd=ubuntu-11.04-server-amd64/initrd.gz url=http://10.66.0.1/ubuntu-11.04-server-amd64.txt
Try PXE booting the Ubuntu install again. You'll still get some initial
questions about language and keyboard (we can deal with those in another
post), but you shouldn't be asked about mirrors - the installer will know to
pull files from your local webserver.
Go through the install on the client, watch the /var/log/nginx-access.log
file on the server, you'll see the installer fetching all kinds of files,
so you'll know it's all working.
You're in business
So at this point you've got yourself a working PXE installation environment
and can do a basic Ubuntu server install.
By adding a few more parameters to your seed file and the PXE
configuration you can eliminate some of the installer questions. I'll
probably write about that in another post, but if you want to figure it
out yourself, check out the Ubuntu Installation Guide - Appendix B. Automating the installation using preseeding
There's so many things you can do with the PXE menus, kernel options, and so
on - it can't all be covered in one place. But hopefully you've got a good
starting point now, if you know all the basic services are in place and
working.


