Building Sentry on FreeBSD

So I was hoping to install the on-premise version of Sentry 9.0.0 on my FreeBSD 11 box, but ran into a snag. I was using the Installation with Python instructions, but it failed to build the semaphore module (another user has an error dump available).
Unfortunately the official response is: We don’t support FreeBSD.

The key error seems to boil down to:

relocation R_X86_64_TPOFF32 against `a local symbol’ can not be used when 
making a shared object; recompile with -fPIC …/…/src/libsodium/.libs/libsodium.a: 
could not read symbols: Bad value cc: error: linker command failed with 
exit code 1 (use -v to see invocation) *** [randombytes] Error code 1

So it's a libsodium error, some more digging found that sodium was a dependency of rust_sodium, which nicely has the ability To use your own copy of libsodium, with the stipulation that you're using the same version they are.

Looking at their rust_sodium/rust_sodium-sys/build.rs shows they're using libsodium 1.0.16, and a check of the FreeBSD security/libsodium Makefile shows the same version - so we're in business.

So after building and installing the libsodium port, I tried the Sentry install again with:

RUST_SODIUM_LIB_DIR=/usr/local/lib pip install -U sentry

and it worked! Overall the FreeBSD ports that need to be installed as build dependencies are:

databases/postgresql11-client
devel/py-virtualenv@py27
graphics/jpeg
lang/rust
security/libsodium
textproc/libxml2
textproc/libxslt

For additional runtime dependencies I've got:

databases/postgresql11-contrib  (Needed for citext extension)
databases/postgresql11-server
databases/redis
mail/exim
sysutils/py-supervisor

After a long build, I got this warning (in red):

redis-py-cluster 1.3.6 has requirement redis==2.10.6, but you'll have redis 2.10.5 which is incompatible.

Looked at https://github.com/getsentry/sentry/blob/9.0.0/requirements-base.txt and found sentry wants redis < 2.10.6, and is OK with redis-py-cluster >= 1.3.4

Looked at https://github.com/Grokzen/redis-py-cluster/blob/1.3.4/requirements.txt and found that version is OK with redis >= 2.10.2

So the fix seems to be to downgrade redis-py-cluster slightly to a version that sentry is OK with, and is OK with the version of redis sentry wants.

pip install -U redis-py-cluster==1.3.4

RancherOS/ISOLinux/Syslinux on FreeBSD bhyve

After messing with Docker on my laptop, I thought it would be interesting to setup a VM on my FreeBSD server to run RancherOS. I've been using vm-bhyve to manage the VMs, and have been running Ubuntu without much problem, so I figured another Linux distro would be fine ... but ended up opening a whole can of worms and while I did get it running eventually, I learned more about grub and booting on bhyve than I really wanted.
I thought I'd jot down some notes here for future reference.

To start with, bhyve is not a general hypervisor that can boot any PC-compatible disk or CD image you throw at it, the way something like KVM, VMWare, or Parallels can. It doesn't start a VM in 16-bit mode and go through an old-school BIOS boot sequence where it reads a Master Boot Record and executes whatever's there. It knows how to load a FreeBSD kernel, and with grub2-bhyve it can boot disks and CDs that use Grub2 - such as Ubuntu.

Unfortunately, RancherOS doesn't use grub, instead it uses Syslinux/ISOLinux on their ISO images and harddisk installations. When bhyve boots using the grub loader, it doesn't find any grub menu on the disk, and just drops you into a grub command prompt.

GNU GRUB  version 2.00

Minimal BASH-like line editing is supported. For the first word, TAB
lists possible command completions. Anywhere else TAB lists possible
device or file completions.

grub>

Fortunately, the grub commandline is like a mini-os, with lots of abilities to look around the disks, and it turns out manually boot things like RancherOS.

The first command to run is:

set pager=1

so that future commands don't just scroll off the screen.

help

displays a list of commands, help <command> gives a short explanation. ls lets you start poking around, in this case giving:

(cd0) (cd0,msdos1) (host)

Now we're getting somewhere. Trying ls (cd0) gives

Device cd0: Filesystem type iso9660 - Label `RancherOS' - Last modification time 2018-09-19 03:09:12 Wednesday, UUID 2018-09-19-03-09-12-00 - Total size 176128 sectors

ls -l (cd0)/ gives

DIR          20180919030909 boot/
DIR          20180919030912 rancheros/

OK, a boot directory, getting closer. ls -l (cd0)/boot gives

170          20180919030909 global.cfg
66978212     20180919030909 initrd-v1.4.1
DIR          20180919030909 isolinux/
1373         20180919030909 linux-current.cfg
12734        20180919030909 rancher.png
5523216      20180919030909 vmlinuz-4.14.67-rancher2

There we go, isolinux, but no grub files, no wonder it doesn't boot. After lots and lots of messing around learning grub, I was able to get an initial boot of the CD image from the grub> prompt with:

linux (cd0)/boot/vmlinuz-4.14.67-rancher2
initrd (cd0)/boot/initrd-v1.4.1
boot

And it started! After lots of Linux boot output I was rewarded with:

                ,        , ______                 _                 _____ _____TM
   ,------------|'------'| | ___ \               | |               /  _  /  ___|
  / .           '-'    |-  | |_/ /__ _ _ __   ___| |__   ___ _ __  | | | \ '--.
  \/|             |    |   |    // _' | '_ \ / __| '_ \ / _ \ '__' | | | |'--. \
    |   .________.'----'   | |\ \ (_| | | | | (__| | | |  __/ |    | \_/ /\__/ /
    |   |        |   |     \_| \_\__,_|_| |_|\___|_| |_|\___|_|     \___/\____/
    \___/        \___/     Linux 4.14.67-rancher2

    RancherOS #1 SMP Thu Sep 13 15:37:04 UTC 2018 rancher ttyS0
    docker-sys: 172.18.42.1 eth0: 10.66.0.48 lo: 127.0.0.1
rancher login:

Very cool, but what's the login? Userid is rancher, but there is no default password. According to the rancher docs, the ISO image is supposed to auto-login. Now what?

After rebooting and getting back to the grub> prompt, and digging around more, I found that cat (cd0)/boot/global.cfg showed:

APPEND rancher.autologin=tty1 rancher.autologin=ttyS0 rancher.autologin=ttyS1 rancher.autologin=ttyS1 console=tty1 console=ttyS0 console=ttyS1 printk.devkmsg=on panic=10

Ah, LInux command parameters including autologin stuff. To apply them it ended up being (again at the grub> prompt):

linux (cd0)/boot/vmlinuz-4.14.67-rancher2 rancher.autologin=tty1 rancher.autologin=ttyS0 rancher.autologin=ttyS1 rancher.autologin=ttyS1 console=tty1 console=ttyS0 console=ttyS1 printk.devkmsg=on panic=10
initrd (cd0)/boot/initrd-v1.4.1
boot

(that commandline could probably be simplified since we can see from the banner that our VM console is ttyS0, so we probably don't need the params relating to tty1 or ttyS1) This time I got the cattle banner from above, and a beautiful:

Autologin default
[rancher@rancher ~]$

A simple sudo -s (not requiring a password) gives root access. At that point you can do whatever, including installing onto a harddisk.

To get a RancherOS harddisk installation to boot, you'd have to go through similar steps with grub in exploring around the (hd0,1) disk to find the kernel, initrd, and kernel params. The grub commands for booting can be saved permanently in the vm-bhyve config for this machine with grub_runX lines like:

grub_run0="linux (hd0,1)/boot/vmlinuz-4.14.67-rancher2 rancher.autologin=ttyS0 printk.devkmsg=on rancher.state.dev=LABEL=RANCHER_STATE rancher.state.wait panic=10 console=tty0"
grub_run1="initrd (hd0,1)/boot/initrd-v1.4.1"
grub_run2="boot"

So the full vm-bhyve config file looks like (in case you're wondering - I hate it when people give snippets of code but don't show where it should go exactly):

loader="grub"
grub_run0="linux (hd0,1)/boot/vmlinuz-4.14.67-rancher2 rancher.autologin=ttyS0 printk.devkmsg=on rancher.state.dev=LABEL=RANCHER_STATE rancher.state.wait panic=10 console=tty0"
grub_run1="initrd (hd0,1)/boot/initrd-v1.4.1"
grub_run2="boot"
cpu=2
memory=2048M
network0_type="virtio-net"
network0_switch="public"
disk0_type="virtio-blk"
disk0_name="disk0"
disk0_dev="sparse-zvol"
uuid="7f9fc9e5-c835-11e8-a327-e03f49af0c7d"
network0_mac="58:9c:fc:05:2a:04"

With that, my VM now boots without manual intervention, even though the virtual disk doesn't use grub.

Mercurial escaped colors

After upgrading Mercurial to 4.2 on my FreeBSD 10.x boxes, there was a problem in that the mercurial color extension was now enabled, and suddenly things like hg status were showing output like

ESC[0;34;1mM ESC[0mESC[0;34;1mpf.confESC[0m

after lots of digging, finally figured out it was caused by my PAGER environment variable being set to more, pretty outdated. Fixed it on-the-fly with export PAGER='less -X' and got nice colorized output. Made it permanent by editing ~/.profile and replacing a line I had setting the PAGER with a new one:

PAGER='less -X';    export PAGER

IPv6 World Launch Day

IPv6 Logo

I've been working on getting this website up and running under IPv6, and it turned out to be somewhat involved. Firstly, I signed up with Hurricane Electric's tunnelbroker.net, to get IPv6 connectivity, because my ISP doesn't offer it yet. Setup my own DNS servers running nsd, which was a bit of a learning curve, but in the long run I think it'll be better than working with goofy DNS managers like you'd find on registrar or hosting websites.
NameCheap is now letting you setup IPv6 glue records right on their website (previously you had to file a support ticket), so that made things easier.

The only big glitch I ran into is that on FreeBSD, using simply

listen [::]:80;

to listen to both IPv4 and IPv6 didn't work. When trying that, I found that any request coming in as IPv4 would give weird 403 or 404 (I don't remember which) errors, where it seemed nginx just didn't know what virtual host to go to.
Linux doesn't seem to have that problem. Ended up using separate listen statements, as in:

listen 80 default_server;
listen [::]:80 default_server ipv6only=on;

for the main site, but VERY IMPORTANTLY, the remaining sites could not have the ipv6only=on directive, they just simply say

listen  80;
listen [::]:80;

(found that trick in this ServerFault page). This also has the advantage of showing proper IPv4 IP addresses in the logs, instead of IPv4-mapped IPv6 addresses such as ::ffff:11.22.33.44, so I ended up doing the same thing on a Linux box even though it handled dual-stack by default just fine.

I also for testing purposes, made aliases

To force one protocol or the other. When you use http://barryp.org/blog/, it's not obvious which you're using.

Debian GNU/kFreeBSD in a FreeBSD Jail - part 2

Previously I wrote about getting Debian GNU/kFreeBSD working in a jail. I've worked on it a bit more, polishing things up so I've got it working pretty seamlessly with my existing ezjail FreeBSD jails, so everything starts automatically, and you can use the ezjail commands to stop/restart the jail.

Here are a few more notes about how things got setup for my jail I named debian:

Kernel Modules

In /boot/loader.conf, I added these lines:

fdescfs_load="YES"
linprocfs_load="YES"
linsysfs_load="YES"
tmpfs_load="YES"

Mounting Filesystems

Created /etc/fstab.debian and populated with:

linproc     /jails/debian/proc      linprocfs       rw 0 0
linsys      /jails/debian/sys       linsysfs        rw 0 0
tmpfs       /jails/debian/lib/init/rw   tmpfs       rw 0 0

ezjail Config

Created /usr/local/etc/ezjail/debian with these contents:

export jail_debian_hostname="debian"
export jail_debian_ip="127.0.0.6"
export jail_debian_interface="lo0"
export jail_debian_rootdir="/jails/debian"
export jail_debian_mount_enable="YES"
export jail_debian_devfs_enable="YES"
export jail_debian_devfs_ruleset="devfsrules_jail"
export jail_debian_fdescfs_enable="YES"
export jail_debian_exec_start="/etc/init.d/rc 3"
export jail_debian_flags="-l -u root"

I also tried adding an IPv6 address to the jail, and that seems to work OK

So you can now stop/start with jail with

service ezjail.sh stop debian
service ezjail.sh start debian

Connect to the jail console

If you create a symlink for login (so that from the jail's POV there's a /usr/bin/login, like there would be on a FreeBSD jail)

cd /jails/debian/usr/bin/
ln -s ../../bin/login .

then you can use the ezjail-admin command to get a console in the jail, with:

ezjail-admin console debian

Otherwise, I've been using my own script to get a console (which assumes bash is installed in the jail), named /usr/local/sbin/jlogin

#!/bin/sh
#
# log into a jail, running bash
#
JID=`jls | grep " $1 " | awk '{print $1}'`
exec jexec $JID env -i PATH=/sbin:/bin:/usr/sbin:/usr/bin:/usr/local/sbin:/usr/local/bin TERM=$TERM EDITOR=$EDITOR LANG=$LANG HOME=/root bash -l

That runs as:

jlogin debian

Debian GNU/kFreeBSD in a FreeBSD Jail

I've been a FreeBSD user for quite some time, going back to 3.3 or so, and for the last serveral years have also been working a lot with Ubuntu Linux. So when I ran across Debian GNU/kFreeBSD, which provides a Debian environment on top of a FreeBSD kernel, I was somewhat intrigued. It got even more interesting when I found a tutorial on setting up GNU/kFreeBSD in a jail. The notion of having a Debian environment on my home FreeBSD server without having to get something like VirtualBox running was just too good to pass up.

I got it running fairly decently, but along the way ran into some small problems - and thought I'd jot down what they were and what the fixes were.

FreeBSD Update

At first, I was using FreeBSD 8.2-RELEASE, and used debootstrap to install Debian Squeeze, as the tutorial showed. Once inside the jail, things sort of worked, but most commands, aptitude especially, would die with:

User defined signal 1

It turns out you need a newer kernel than 8.2 to run kFreeBSD in a chroot, as is mentioned in the FAQ. I upgraded my FreeBSD kernel/world to 8.3-PRERELEASE (2012-02-22), and the "signal 1" problem went away.

Debian Update

The next problem was that aptitude would still die, with:

Uncaught exception: Unable to read from stdin: Operation not permitted

After reading about this bug in cwidget, it seemed an upgrade to Wheezy was needed to fix the problem - and sure enough that problem went away.

kbdcontrol and /dev/console

The upgrade to Wheezy didn't go entirely smoothly, mainly due to the kbdcontrol package (required by sysvinit) being unable to access /dev/console in the jail. I wasn't worried about keeping things in the jail isolated for security reasons, so I went ahead and added /dev/console on-the-fly to the running jail by running outside the jail:

devfs -m /jails/debian/dev rule add path 'console*' unhide
devfs -m /jails/debian/dev rule applyset

After that, the kbdcontrol package was able to be upgraded, and I seem to have a Wheezy FreeBSD jail now. Very cool.

UPDATE: A followup talks more about the actual file changes made to run as an ezjail

Automounting ISO images in FreeBSD

Since I've been playing with ISO images a lot lately (see posts tagged: pxe), I thought I'd take a look at making it easier to access their contents, since manually mounting and unmounting them gets to be a drag. It turns out than an Automounter is just what the doctor ordered - a service than will mount a filesystem on demand.

Typically, you'd see automounters mentioned in conjunction with physical CD drives, floppy drives, or NFS mounts - but the idea works just as well for ISO files. This way you can have available both the original ISO image and its contents - but without the contents taking up any additional space.

For FreeBSD, the amd utility will act as our automounter, on Linux systems amd is an option too, but another system called autofs seems to be widely used there - perhaps I'll take a look at that in another post.

Let's start with the desired end result ...

Directory Layout

On my home server I'd like to have this directory layout:

/data/iso/
    images/
        openbsd-4.9-i386.iso                    
        ubuntu-10.04.3-server-amd64.iso
        ubuntu-11.04-server-amd64.iso                    
            .
            .
            .

/data/iso/contents will be where the image contents will be accessible on-the-fly, by directory names based on the iso file names, for example:

/data/iso/
    contents/
        openbsd-4.9-i386/    
            4.9/
            TRANS.TBL
            etc/
        ubuntu-10.04.3-server-amd64/
            README.diskdefines
            cdromupgrade
            dists/
            doc/
            install/
            isolinux/
            md5sum.txt
            .
            .
            .
        ubuntu-11.04-server-amd64/             
        .
        .
        .

Mount/Unmount scripts

amd on FreeBSD doesn't deal directly with ISO files, so we need a couple very small shell scripts than can mount and unmount the images. Let's call the first one /local/iso_mount :

#!/bin/sh
mount -t cd9660 /dev/`mdconfig -f $1` $2

It does two things: first creating a md device based on the given iso filename (the first argument), and mounting the md device at the specified mountpoint (the second argument). Example usage might be:

/local/iso_mount /data/iso/images/ubuntu-11.04-server-amd64.iso /mnt

The second script we'll call /local/iso_unmount

#!/bin/sh
unit=`mdconfig -lv | grep $1 | cut -f 1`
num=`echo $unit | cut -d d -f 2`
umount /dev/$unit
sleep 10
mdconfig -d -u $num

It takes the same parameters as iso_mount. (the sleep call is a bit hackish, but the umount command seems a bit asychronous, and it doesn't seem you can destroy the md device immediately after umount returns - have to give the system a bit of time to finish with the device) To undo our test mount above would be:

/local/iso_unmount /data/iso/images/ubuntu-11.04-server-amd64.iso /mnt

amd Map File

amd is going to need a map file, so that when given a name of a directory that something is attempting to access, it can lookup a location of where to mount it from. For our needs, this can be a one-liner we'll save as /etc/amd.iso-file

*   type:=program;fs:=${autodir}/${key};mount:="/local/iso_mount /local/iso_mount /data/iso/images/${key}.iso ${fs}";unmount:="/local/iso_unmount /local/iso_unmount /data/iso/images/${key}.iso ${fs}"

A map file is a series of lines with

<key> <location>[,<location>,<location>,...]

In our case we've got the wildcard key *, so it'll apply to anything we try to access in /data/iso/contents/, and the location is a semicolon-separated series of directives. type:=program indicates we're specifying mount:= and unmount:= commands to handle this location. ${key} is expanded by amd to be the name of the directory we tried to access.

amd Config File

I decided to use a config file to set things up rather than doing it all as commandline flags, so this is my /etc/amd.conf file:

[ global ]
log_file = syslog

[ /data/iso/contents ]
map_name = /etc/amd.iso-file

Basically telling amd to watch the /data/iso/contents/ directory, and handle attempts to access it based on the map file /etc/amd.iso-file. Also set logging to go to syslog (typically you'd look in /var/log/messages)

Enable it and start

Added these lines to /etc/rc.conf

amd_enable="YES"
amd_flags="-F /etc/amd.conf"

Fire it up with:

service amd start

You should be in business. Unfortunately, if you try

ls /data/iso/contents

the directory will initially appear empty, but if you try

ls /data/iso/contents/openbsd-4.9-i386

you should see a listing of the image's top-level contents (assuming you have a /data/iso/images/openbsd-4.9-i386.iso file). Once an image has been automounted, you will see it in ls /data/iso/contents

Check the mount

If you try:

mount | grep amd

you'll probably seem something like:

/dev/md0 on /.amd_mnt/openbsd-4.9-i386 (cd9660, local, read-only)

The cool thing is, after a couple minutes of inactivity, the mount will go away, and /data/iso/contents will appear empty again.

Manually unmount

The amq utility lets you control the amd daemon, one possibility being to request an unmount to happen now, with for example:

amq -u /data/iso/contents/openbsd-4.9-i386

Conclusion

That's the basics. Now if you're setting up PXE booting and point your Nginx server for example to share /data/iso, you'll be able to reference files within the ISO images, and they'll be available as needed.

Setting up a PXE environment for OS installations

If you're fooling around with various OSes, installing them by first burning CDs or DVDs gets to be a drag - and you end up with piles of old discs that just go into a landfill. Sure, there are rewritable disks, but they wear out and get scratched eventually. USB memsticks can be painful too - sometimes difficult to create and with different BIOSes having different levels of support.

A slick way to go is to set yourself up to do PXE (Preboot eXecution Environment) installations over a network. Most network cards have had PXE support included for many years now. If you have a machine handy that can act as a simple server, you can have an enviroment where you boot a machine, select the OS you want to install from a menu, and everything will just be pulled over your local network.

There are plenty of writeups on how to PXE install Ubuntu from an Ubuntu server, or FreeBSD from a FreeBSD server - but to make things more interesting and explicit I'll go cross-platform and talk about deploying Ubuntu Server 11.04 from a FreeBSD 8.2 server, and try to make it general enough so that later on we can add other OSes to the menu such as CentOS or OpenBSD.

Requirements

PXE booting a machine requires two basic services be present on your network:

  • DHCP - to assign the booted machine an IP address and tell it what "network bootstrap program" (NBP) to fetch from a TFTP server

  • TFTP (Trivial FTP - not to be confused with regular FTP) serves up the initial boot files

OSes such as Ubuntu or CentOS require a third service:

  • HTTP Server - serves up the bulk of the OS install files.

PXELINUX

For the Network Bootstram Program, we'll use PXELINUX, which is available as part of the SYSLINUX project. The name SYSLINUX is a bit misleading in that it's not actually Linux, but rather a collection of bootloaders that are often used with Linux, and capable of loading other OSes as well. Think of something more along the lines of GRUB, than an actual Linux distro.

To start off with, I'll create a /tftpboot directory, download syslinux-4.04.tar.gz from here, extract and copy two files we want:

mkdir /tftpboot
fetch http://www.kernel.org/pub/linux/utils/boot/syslinux/syslinux-4.04.tar.gz
tar xzvf syslinux-4.04.tar.gz
cp syslinux-4.04/core/pxelinux.0 /tftpboot
cp syslinux-4.04/com32/menu/menu.c32 /tftpboot

We're done with the syslinux download now, so you could clean it up if you want with:

rm -rf syslinux-4.04*

Next, create a configuration directory

mkdir /tftpboot/pxelinux.cfg

and in that directory create a file named default with these initial contents:

DEFAULT menu.c32
PROMPT 0
TIMEOUT 200                           

LABEL local                           
    MENU LABEL Local Boot
    LOCALBOOT 0                     

That should be enough to get us a barebones menu when we PXE boot a machine, with a single option to boot off the local harddisk (we'll get to Ubuntu later).

Enable TFTP

TFTP is already included in FreeBSD, just need to make sure it's enabled.

In /etc/inetd.conf make sure this line has the default # removed from the front (so it's not commented out)

tftp   dgram   udp     wait    root    /usr/libexec/tftpd      tftpd -l -s /tftpboot

In /etc/rc.conf, make sure inetd is enabled, adding if necessary:

inetd_enable="YES"

Depending on what you had to do above, start, or reload the inetd daemon with:

service inetd start

or

service inetd reload

Check that the machine is now listing on UDP port 69

sockstat | grep :69

See if you can fetch the NBP using the tftp utility (assuming your server's IPv4 address on the network you'll be doing PXE boots is 10.0.0.1)

cd /tmp
tftp 10.0.0.1
tftp> get /pxelinux.0
tftp> quit
rm pxelinux.0

If it works you should have seen somthing like:

Received 26443 bytes during 0.1 seconds in 53 blocks

Tweak DHCP Server

For this part I'm assuming you're running an ISC dhcpd server (if not, we'll have to cover that in another post). You basically just need to add two lines to /usr/local/etc/dhcpd.conf telling a client what server to use for TFTP and what NBP to fetch:

next-server 10.0.0.1;
filename "/pxelinux.0";

On my server, I just wanted to do this on one particular subnet, so there's a chunk that looks something like this now:

subnet 10.0.0.0 netmask 255.255.255.0 
    {
    range 10.0.0.127 10.0.0.250;
    option routers 10.0.0.1;

    next-server 10.0.0.1;
    filename "/pxelinux.0";
    }

Restart dhcpd

service isc-dhcpd restart

Give it a try

On your client machine, you may have to poke around in the BIOS to enable PXE booting. You'll have to figure out this part for yourself. If you can select your Network Card as the boot device, and everything else is working right, you should see a simple menu something like this:

Initial success

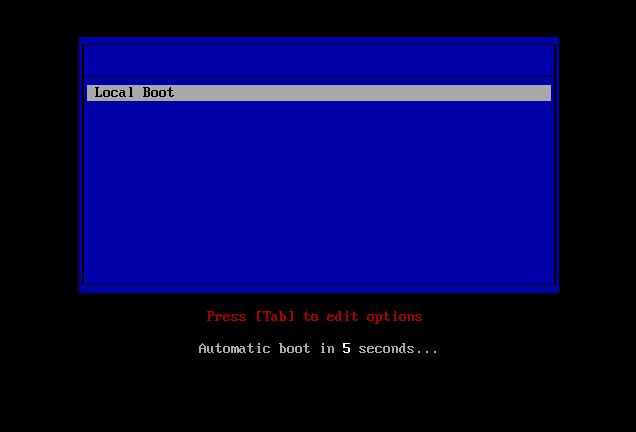
OK! we're at the "Hello World" stage, we know the client and server are doing the bare minimum necessary for PXE to function at all. Time to move on to the good stuff.

Ubuntu Server 11.04

For this next step, I'll assume you've downloaded an ISO into say /foo/ubuntu-11.04-server-amd64.iso The specific version shouldn't matter too much, so if you want to do 10.04 LTS or something else, it should all be about the same.

Mount the ISO image, so we can copy a couple files into /tftpboot and share the rest with a web server.

mkdir -P /iso_images/ubuntu-11.04-server-amd64
mount -t cd9660 /dev/`mdconfig -f /foo/ubuntu-11.04-server-amd64.iso` /iso_images/ubuntu-11.04-server-amd64
mkdir /tftpboot/ubuntu-11.04-server-amd64
cp /iso_images/ubuntu-11.04-server-amd64/install/netboot/ubuntu-installer/amd64/linux /tftpboot/ubuntu-11.04-server-amd64
cp /iso_images/ubuntu-11.04-server-amd64/install/netboot/ubuntu-installer/amd64/initrd.gz /tftpboot/ubuntu-11.04-server-amd64

So now our /tftpboot directory has these five files underneath it:

pxelinux.0
pxelinux.cfg/default
menu.c32
ubuntu-11.04-server-amd64/linux
ubuntu-11.04-server-amd64/initrd.gz

To the /tftpboot/pxelinux.cfg/default file append

LABEL ubuntu-11.04-server-amd64-install             
    MENU LABEL Ubuntu 11.04 Server AMD64 Install
    kernel ubuntu-11.04-server-amd64/linux
    append vga=788 initrd=ubuntu-11.04-server-amd64/initrd.gz

Try PXE booting your client again, this time you'll have "Ubuntu 11.04 Server AMD64 Install" as one of your choices, select that, cross your fingers, and if all goes well in a few seconds you should see:

Initial success

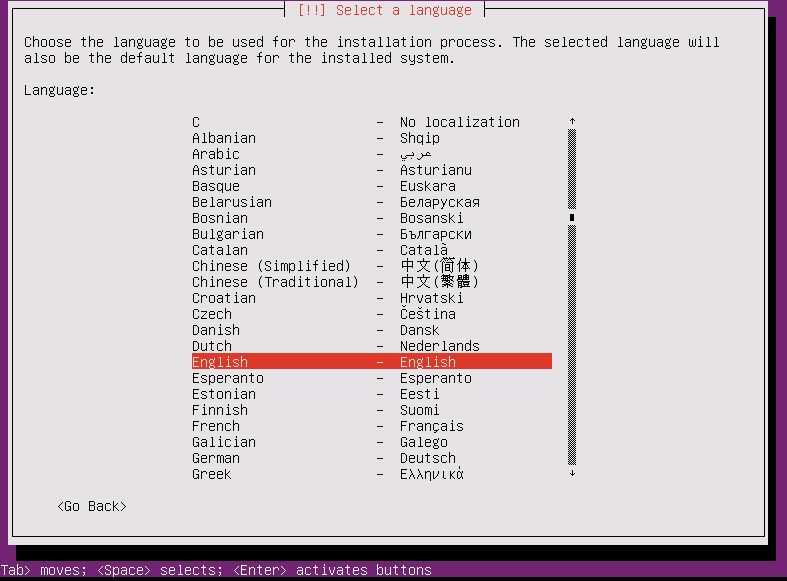
and you can go through and answer the initial questions about the install.

If you're OK with pulling the bulk of the OS over the internet from the official Ubuntu mirrors, it should work although it might be slow. Since we have a nice server sitting on our LAN with a copy of the ISO, we should setup to use that and do a much faster install.

Web Server

For this example, I'll assume nginx has been installed as the webserver (any one will do though, so if you've already got apache installed - that'll work fine too).

The default nginx install uses /usr/local/www/nginx as its docroot, lets put a symlink to our mounted ISO image in there:

ln -s /iso_images/ubuntu-11.04-server-amd64 /usr/local/www/nginx

and also put in a minimal Debian Installer "preseed" file in there that'll help things along by telling the installer to use our webserver for the installation packages. Create a text file named /usr/local/www/nginx/ubuntu-11.04-server-amd64.txt with these contents:

d-i mirror/country string manual
d-i mirror/http/hostname string 10.0.0.1
d-i mirror/http/directory string /ubuntu-11.04-server-amd64
d-i mirror/http/proxy string

Check that you can fetch that file with the URL: http://10.0.0.1/ubuntu-11.04-server-amd64.txt

Edit the /tftpboot/pxelinux.cfg/default file and append

url=http://10.66.0.1/ubuntu-11.04-server-amd64.txt

to the end of the append line of our Ubuntu section, so it now looks like:

LABEL ubuntu-11.04-server-amd64-install             
    MENU LABEL Ubuntu 11.04 Server AMD64 Install
    kernel ubuntu-11.04-server-amd64/linux
    append vga=788 initrd=ubuntu-11.04-server-amd64/initrd.gz url=http://10.66.0.1/ubuntu-11.04-server-amd64.txt

Try PXE booting the Ubuntu install again. You'll still get some initial questions about language and keyboard (we can deal with those in another post), but you shouldn't be asked about mirrors - the installer will know to pull files from your local webserver.

Go through the install on the client, watch the /var/log/nginx-access.log file on the server, you'll see the installer fetching all kinds of files, so you'll know it's all working.

You're in business

So at this point you've got yourself a working PXE installation environment and can do a basic Ubuntu server install.

By adding a few more parameters to your seed file and the PXE configuration you can eliminate some of the installer questions. I'll probably write about that in another post, but if you want to figure it out yourself, check out the Ubuntu Installation Guide - Appendix B. Automating the installation using preseeding

There's so many things you can do with the PXE menus, kernel options, and so on - it can't all be covered in one place. But hopefully you've got a good starting point now, if you know all the basic services are in place and working.

RabbitMQ FreeBSD port

I was happy to see a FreeBSD port added for RabbitMQ, net/rabbitmq, although I found a couple problems with it: it doesn't start automatically when your machine or jail boots, and when building the rabbitmq-erlang-client, it errors out with:

src/amqp_channel.erl:28: can't find include lib "rabbitmq_server/include/rabbit.hrl"
src/amqp_channel.erl:29: can't find include lib "rabbitmq_server/include/rabbit_framing.hrl"

I worked on the port a bit, and submitted a bug report and patch, ports/127033, that fixes these problems.

SSH in a FreeBSD jail

I've been running lots of FreeBSD jails on various servers I maintain, and one thing I've noticed is that using ssh or scp from inside a jail often results in the error: Host key verification failed. A little Google searching turns up this explanation, that the problem is caused when you jexec into the jail instead of logging in normally through SSH.

I often run the jails in a pretty minimal way and don't really want to run sshd in them, and fortunately the problem can be worked around somewhat. Apparently the Host key verification failed. error is caused when SSH is unable to show you this type of prompt:

The authenticity of host 'foobar.edu' can't be established.
DSA key fingerprint is 7c:ac:b0:da:be:3c:c2:00:00:00:00:ce:db:fb:49:77.
Are you sure you want to continue connecting (yes/no)?

when connecting to a host you haven't connected to before. All you have to do to get around this is manually add a line to the jail's ~/.ssh/known_hosts for the server you're trying to connect to, probably by copying one from a known_hosts on another box or outside the jail.

Once past that, you may find that SSH is still unhappy in the jail if you don't have publickey authentication setup with the server you're trying to connect to, with an error like:

Permission denied, please try again.
Permission denied (publickey,password).

Fixing that is just a matter of generating or copying a private/public key pair into the jail's ~/.ssh directory, and putting the public key on the server you're connecting to.