CGI Scripts with Nginx using SCGI

Using scgi_run with Nginx

Nginx is a great web server, but one thing it doesn't support is CGI scripts. Not all webapps need to be high-performance setups capable of hundreds or thousands of requests per second. Sometimes you just want something capable of handling a few requests now and then, and don't want to keep a long-running process going all the time just for that one webapp. How do you handle something like that under Nginx?

Well, it turns out you're going to have to have something running as a long-running external process to help Nginx out (because Nginx can't spawn processes itself). It just doesn't have to be dedicated to any one particular webapp. One way to go would be to setup another webserver that can do CGI scripts, and have Nginx proxy to that when need be.

Apache is one possibility, something like this:

Nginx <-> Apache

But Apache's a fairly big program, has lots of features, a potentially complicated configuration. Kind of defeats the purpose of going to a lighter-weight program like Nginx. What else can we do?

Super-servers

Many Unix-type systems will have a super-server available to launch daemons as need be when some network connection is made. On BSD boxes it's typically inetd, MacOSX has launchd, Linux distros often have xinetd or other choices available.

If we already have a super-server running on our box, why not setup Nginx to connect to that, and let the super-server take care of launching our CGI script? We just need one extra piece of the puzzle, something to read a web request over the socket Nginx opened up, setup the CGI environment, and execute the script.

Wait, that sounds like a web server - aren't we back to something like Apache again? No, it doesn't have to be anything nearly that complicated if we were to use the SCGI protocol, instead of HTTP.

SCGI

SCGI is a very simple protocol that's supported by Nginx and many other webservers. It's much much simpler than FastCGI, and maps pretty closely to the CGI specfication, with one minor difference to note...

In the CGI RFC, the response may contain an optional Status line, as in:

Status: 200 OK

In the SCGI protocol, the Status line is required, not optional.

Nginx will function with the Status line missing, but there'll be warnings in your error log.

If you can alter your CGI scripts to include a Status line, or live with warnings in logs, we have a way forward now.

scgi_run

I've got a C project on GitHub that implements this small piece of glue to turn a SCGI request into a CGI enviroment. The binary weighs in at around 8 to 12 Kilobytes after being stripped.

Basically, we're looking at a flow like this:

Nginx <-> SCGI

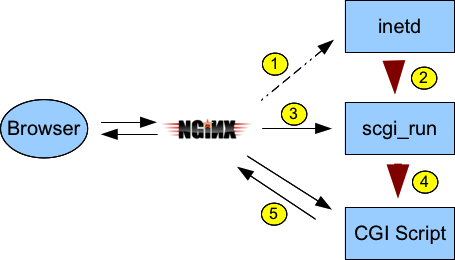
  1. Nginx connects to a socket listened to by inetd
  2. inetd spawns scgi_run, with stdin and stdout wired to the accepted connection
  3. scgi_run reads SCGI request headers from stdin and sets up a CGI environment
  4. scgi_run execs CGI script (stdin and stdout are still connected to the socket to Nginx)
  5. CGI script reads request body if necessary from stdin and writes response out through stdout.

A couple things to note here

  • when we get to the final step, the CGI script is talking directly to Nginx - there's no buffering by any other applications like there would be in an Apache setup.
  • scgi_run is no longer executing, it execed the CGI script so there's not another process hanging around waiting on anything.
  • A super-server like inetd can typically be configured to run the handler under any userid you want, so you basically get SUEXEC-type functionality for free here.

The scgi_run code on GitHub operates in two modes:

  1. If argv[1] ends with a slash /, then argv[1] is taken to be a directory name, and the program will look for the SCRIPT_FILENAME passed by Nginx in that directory.
  2. Otherwise, argv[1] is taken as the path to a specific CGI script (so SCRIPT_FILENAME is ignored), and any additional arguments are passed on to the CGI script.

Configuration

A simple setup looks something like this, assuming you've compiled scgi_run and have the binary stored as /local/scgi_run

For FreeBSD inetd for example, you might add a line to /etc/inetd.conf like this:

:www:www:600:/var/run/scgi_localcgi.sock stream  unix    nowait/16   www /local/scgi_run /local/scgi_run /local/cgi-bin/

Which causes inetd to listen to a Unix socket named /var/run/scgi_localcgi.sock, and when a connection is made, it spawns /local/scgi_run with argv[0] set to /local/scgi_run and argv[1] set to /local/cgi-bin/. As a bonus, the socket ownership is set to www:www and chmoded to 0600, which limits who can connect to it.

In Nginx, you might have something like:

location /local-cgi/ {
    alias /local/cgi-bin/;

    scgi_pass unix:/var/run/scgi_localcgi.sock;
    include /usr/local/etc/nginx/scgi_params;
    scgi_param  SCRIPT_NAME $fastcgi_script_name;
    scgi_param  PATH_INFO $fastcgi_path_info;
    scgi_param  SCRIPT_FILENAME $request_filename;
}

And then for a simple script, you might have /local/cgi-bin/hello.sh as

#!/bin/sh
echo "Status: 200 OK"
echo "Content-Type: text/plain"
echo ""
echo "Hello World"

That you would run by hitting http://localhost/local-cgi/hello.sh

Conclusion

So, with the help of a tiny 8KB binary, Nginx (or any other SCGI client) with the help of a super-server like inetd can execute CGI scripts (keeping in mind though the requirement for the Status line). It's a fairly lightweight solution that may also be useful in embedded situations.

Enjoy, and go buy some harddrives to store your CGI scripts on, I hear SSDs are very nice. :)

Running MemTest86+ over PXE

Previously, we looked at Setting up a PXE environment for OS installations. This post will build on that by adding the MemTest86+ to the PXE environment, so you can easily run memory checks on network-connected machines.

This will be a really easy one. First, download the MemTest86+ binary into your /tftpboot directory and decompress it:

cd /tftpboot
fetch http://www.memtest.org/download/4.20/memtest86+-4.20.bin.gz
gzip -d memtest86+-4.20.bin.gz

Edit the /tftpboot/pxelinux.cfg/default file to add this menu entry for MemTest

LABEL memtest86plus
    MENU LABEL MemTest86+ 4.20
    linux memtest86+-4.20.bin

That's it, you should now be able to run MemTest over the network.

PXELINUX File Extensions

One extra thing to point out in case you're interested...

The PXELINUX menu entry above says linux memtest86+-4.20.bin instead of kernel memtest86+-4.20.bin because when you use the kernel keyword, PXELINUX looks at the file extension '.bin' and treats the file like a CD boot sector (which it is not in this case). When I tried kernel I just got a stream of:

8200
8200
8200

on the screen over and over. Alternatively, you could rename the MemTest file to something without the .bin extension, such as memtest86p420 and then say kernel memtest86p420 and it would work.

The SYSLINUX wiki mentions this on the Common Problems page.

Setting up a PXE environment for OS installations

If you're fooling around with various OSes, installing them by first burning CDs or DVDs gets to be a drag - and you end up with piles of old discs that just go into a landfill. Sure, there are rewritable disks, but they wear out and get scratched eventually. USB memsticks can be painful too - sometimes difficult to create and with different BIOSes having different levels of support.

A slick way to go is to set yourself up to do PXE (Preboot eXecution Environment) installations over a network. Most network cards have had PXE support included for many years now. If you have a machine handy that can act as a simple server, you can have an enviroment where you boot a machine, select the OS you want to install from a menu, and everything will just be pulled over your local network.

There are plenty of writeups on how to PXE install Ubuntu from an Ubuntu server, or FreeBSD from a FreeBSD server - but to make things more interesting and explicit I'll go cross-platform and talk about deploying Ubuntu Server 11.04 from a FreeBSD 8.2 server, and try to make it general enough so that later on we can add other OSes to the menu such as CentOS or OpenBSD.

Requirements

PXE booting a machine requires two basic services be present on your network:

  • DHCP - to assign the booted machine an IP address and tell it what "network bootstrap program" (NBP) to fetch from a TFTP server

  • TFTP (Trivial FTP - not to be confused with regular FTP) serves up the initial boot files

OSes such as Ubuntu or CentOS require a third service:

  • HTTP Server - serves up the bulk of the OS install files.

PXELINUX

For the Network Bootstram Program, we'll use PXELINUX, which is available as part of the SYSLINUX project. The name SYSLINUX is a bit misleading in that it's not actually Linux, but rather a collection of bootloaders that are often used with Linux, and capable of loading other OSes as well. Think of something more along the lines of GRUB, than an actual Linux distro.

To start off with, I'll create a /tftpboot directory, download syslinux-4.04.tar.gz from here, extract and copy two files we want:

mkdir /tftpboot
fetch http://www.kernel.org/pub/linux/utils/boot/syslinux/syslinux-4.04.tar.gz
tar xzvf syslinux-4.04.tar.gz
cp syslinux-4.04/core/pxelinux.0 /tftpboot
cp syslinux-4.04/com32/menu/menu.c32 /tftpboot

We're done with the syslinux download now, so you could clean it up if you want with:

rm -rf syslinux-4.04*

Next, create a configuration directory

mkdir /tftpboot/pxelinux.cfg

and in that directory create a file named default with these initial contents:

DEFAULT menu.c32
PROMPT 0
TIMEOUT 200                           

LABEL local                           
    MENU LABEL Local Boot
    LOCALBOOT 0                     

That should be enough to get us a barebones menu when we PXE boot a machine, with a single option to boot off the local harddisk (we'll get to Ubuntu later).

Enable TFTP

TFTP is already included in FreeBSD, just need to make sure it's enabled.

In /etc/inetd.conf make sure this line has the default # removed from the front (so it's not commented out)

tftp   dgram   udp     wait    root    /usr/libexec/tftpd      tftpd -l -s /tftpboot

In /etc/rc.conf, make sure inetd is enabled, adding if necessary:

inetd_enable="YES"

Depending on what you had to do above, start, or reload the inetd daemon with:

service inetd start

or

service inetd reload

Check that the machine is now listing on UDP port 69

sockstat | grep :69

See if you can fetch the NBP using the tftp utility (assuming your server's IPv4 address on the network you'll be doing PXE boots is 10.0.0.1)

cd /tmp
tftp 10.0.0.1
tftp> get /pxelinux.0
tftp> quit
rm pxelinux.0

If it works you should have seen somthing like:

Received 26443 bytes during 0.1 seconds in 53 blocks

Tweak DHCP Server

For this part I'm assuming you're running an ISC dhcpd server (if not, we'll have to cover that in another post). You basically just need to add two lines to /usr/local/etc/dhcpd.conf telling a client what server to use for TFTP and what NBP to fetch:

next-server 10.0.0.1;
filename "/pxelinux.0";

On my server, I just wanted to do this on one particular subnet, so there's a chunk that looks something like this now:

subnet 10.0.0.0 netmask 255.255.255.0 
    {
    range 10.0.0.127 10.0.0.250;
    option routers 10.0.0.1;

    next-server 10.0.0.1;
    filename "/pxelinux.0";
    }

Restart dhcpd

service isc-dhcpd restart

Give it a try

On your client machine, you may have to poke around in the BIOS to enable PXE booting. You'll have to figure out this part for yourself. If you can select your Network Card as the boot device, and everything else is working right, you should see a simple menu something like this:

Initial success

OK! we're at the "Hello World" stage, we know the client and server are doing the bare minimum necessary for PXE to function at all. Time to move on to the good stuff.

Ubuntu Server 11.04

For this next step, I'll assume you've downloaded an ISO into say /foo/ubuntu-11.04-server-amd64.iso The specific version shouldn't matter too much, so if you want to do 10.04 LTS or something else, it should all be about the same.

Mount the ISO image, so we can copy a couple files into /tftpboot and share the rest with a web server.

mkdir -P /iso_images/ubuntu-11.04-server-amd64
mount -t cd9660 /dev/`mdconfig -f /foo/ubuntu-11.04-server-amd64.iso` /iso_images/ubuntu-11.04-server-amd64
mkdir /tftpboot/ubuntu-11.04-server-amd64
cp /iso_images/ubuntu-11.04-server-amd64/install/netboot/ubuntu-installer/amd64/linux /tftpboot/ubuntu-11.04-server-amd64
cp /iso_images/ubuntu-11.04-server-amd64/install/netboot/ubuntu-installer/amd64/initrd.gz /tftpboot/ubuntu-11.04-server-amd64

So now our /tftpboot directory has these five files underneath it:

pxelinux.0
pxelinux.cfg/default
menu.c32
ubuntu-11.04-server-amd64/linux
ubuntu-11.04-server-amd64/initrd.gz

To the /tftpboot/pxelinux.cfg/default file append

LABEL ubuntu-11.04-server-amd64-install             
    MENU LABEL Ubuntu 11.04 Server AMD64 Install
    kernel ubuntu-11.04-server-amd64/linux
    append vga=788 initrd=ubuntu-11.04-server-amd64/initrd.gz

Try PXE booting your client again, this time you'll have "Ubuntu 11.04 Server AMD64 Install" as one of your choices, select that, cross your fingers, and if all goes well in a few seconds you should see:

Initial success

and you can go through and answer the initial questions about the install.

If you're OK with pulling the bulk of the OS over the internet from the official Ubuntu mirrors, it should work although it might be slow. Since we have a nice server sitting on our LAN with a copy of the ISO, we should setup to use that and do a much faster install.

Web Server

For this example, I'll assume nginx has been installed as the webserver (any one will do though, so if you've already got apache installed - that'll work fine too).

The default nginx install uses /usr/local/www/nginx as its docroot, lets put a symlink to our mounted ISO image in there:

ln -s /iso_images/ubuntu-11.04-server-amd64 /usr/local/www/nginx

and also put in a minimal Debian Installer "preseed" file in there that'll help things along by telling the installer to use our webserver for the installation packages. Create a text file named /usr/local/www/nginx/ubuntu-11.04-server-amd64.txt with these contents:

d-i mirror/country string manual
d-i mirror/http/hostname string 10.0.0.1
d-i mirror/http/directory string /ubuntu-11.04-server-amd64
d-i mirror/http/proxy string

Check that you can fetch that file with the URL: http://10.0.0.1/ubuntu-11.04-server-amd64.txt

Edit the /tftpboot/pxelinux.cfg/default file and append

url=http://10.66.0.1/ubuntu-11.04-server-amd64.txt

to the end of the append line of our Ubuntu section, so it now looks like:

LABEL ubuntu-11.04-server-amd64-install             
    MENU LABEL Ubuntu 11.04 Server AMD64 Install
    kernel ubuntu-11.04-server-amd64/linux
    append vga=788 initrd=ubuntu-11.04-server-amd64/initrd.gz url=http://10.66.0.1/ubuntu-11.04-server-amd64.txt

Try PXE booting the Ubuntu install again. You'll still get some initial questions about language and keyboard (we can deal with those in another post), but you shouldn't be asked about mirrors - the installer will know to pull files from your local webserver.

Go through the install on the client, watch the /var/log/nginx-access.log file on the server, you'll see the installer fetching all kinds of files, so you'll know it's all working.

You're in business

So at this point you've got yourself a working PXE installation environment and can do a basic Ubuntu server install.

By adding a few more parameters to your seed file and the PXE configuration you can eliminate some of the installer questions. I'll probably write about that in another post, but if you want to figure it out yourself, check out the Ubuntu Installation Guide - Appendix B. Automating the installation using preseeding

There's so many things you can do with the PXE menus, kernel options, and so on - it can't all be covered in one place. But hopefully you've got a good starting point now, if you know all the basic services are in place and working.

amqplib 1.0.0

I attended OSCON for the first time this year, and to celebrate I thought I'd wrap up the Python amqplib library a bit and consider it more-or-less finished for what it is (a simple blocking 0-8 client), and call it 1.0.0 You can find it on the in PyPi and Google Project Hosting

It's definitely a worthwhile upgrade in that it's significantly faster than amqplib 0.6.1, and has a fair number of bug fixes. Also noteworthy are support for Python 3.x (via 2to3) and IPv6

smbpasswd 1.0.2 submitted to PyPi

smbpasswd is a really old piece of software (9 years!) for generating NT/LM password hashes, suitable for use with Samba. It's in Debian/Ubuntu/Redhat repositories, and FreeBSD ports, and who knows where else.

Somehow it never got submitted to PyPi, but I took care of that today at the request of someone working on another Python module that wanted to use this as a dependency. Look for smbpasswd-1.0.2, or just easy_install smbpasswd if you're setup for that.

I changed the packaging slightly, so that the tarball extracts to smbpasswd-x.x.x instead of py-smbpasswd-x.x.x, and so bumped the version number to 1.0.2 just for the packaging changes. The library itself is unchanged.

However, I think you'd want to be very careful generating and storing LM hashes of user's passwords, they seem to be wildly insecure.

If your app can get by with just NT hashes, and you have a Python >= 2.5, you may be able to generate those using the standard Python library, and don't need this package at all. See the notes on my py-md4 page.

Rebuilding Hyper-V Linux Integration Components for a kernel upgrade

At work I've been running RedHat Enterprise Linux (RHEL) 5.6 on top of a Windows Server 2008 R2 Hyper-V host, with Linux Integration Components (LinuxIC) installed.

That all worked fine until I did a yum update on RHEL to pick up a new kernel and tried to reboot. The new kernel panicked, saying it couldn't find my LVM volume groups. Fortunately, the old kernel was still on the menu and booted OK.
Turns out the new kernel for whatever reason wouldn't see the virtual disks for that machine.

OK, so I needed to rebuild LinuxIC for the new kernel while running the old kernel, how to do that? The Makefile and various scripts that come with LinuxIC basically builds for and installs on the currently running kernel. Fortunately I came across this post showing a trick of replacing /bin/uname with a fake version that shows the kernel version number you want to build for. Tried that and was back in business.

I think this would work too, without messing with the original /bin/uname: create a directory somewhere, say '/tmp/fake_uname' and stick this file in it with the name uname (changing the "echo" line with the installed kernel version number you want to build for.

#/bin/sh case $1 in -r) echo "2.6.18-238.9.1.el5" ;; *) exec /bin/uname $1 ;; esac

Then build and install your Linux IC with the /tmp/fake_uname prepended to your PATH as in

PATH=/tmp/fake_uname:$PATH make
PATH=/tmp/fake_uname:$PATH make install

When the LinuxIC build calls uname it finds the fake version first, and if the argument is -r shows you desired version number, otherwise falls back to the real uname.

Simple debugging output in C

I don't do a whole lot of C programming, but when I do it tends to be in difficult environments like Apache modules or Samba VFS modules, where you can't just do simple printfs to get some output from your program.

I've come up with this small chunk of code I can plop in a C file to allow for optionally writing out useful information to a file somewhere on the disk.

#ifdef DEBUG_FILENAME
    #include <stdarg.h>
    #include <stdio.h>
    #include <time.h>
    #define QUOTE(name) #name
    #define STR(macro) QUOTE(macro)

    static void debug_log(const char *msg, ...) {
        char timestamp[32]; // really only need 21 bytes here
        time_t now;
        va_list ap;
        FILE *f;

        now = time(NULL);
        strftime(timestamp, sizeof(timestamp), "%Y-%m-%d %H:%M:%S ", localtime(&now));

        f = fopen(STR(DEBUG_FILENAME), "a");

        fputs(timestamp, f);

        va_start(ap, msg);
        vfprintf(f, msg, ap);
        va_end(ap);

        fputc('\n', f);
        fclose(f);
    }
#else
    #define debug_log
#endif

Within your program, you'd just sprinkle in calls to debug_log() with a format string and optional arguments, such as:

x = 5;
y = 10;
debug_log("Currently, x=%d, y=%d", x, y);

The code can then be enabled and configured to output to /tmp/foo.log (for example), by adding either

#define DEBUG_FILENAME /tmp/foo.log

to the top of your source file, or even more slickly for some things, from the commandline with

cc -DDEBUG_FILENAME=/tmp/foo.log myprogram.c

When the program is run, in your /tmp/foo.log file you'd find something like:

2011-04-03 20:30:05 Currently, x=5, y=10

If you don't define DEBUG_FILENAME, the code basically goes away, shouldn't take up any space in your binary at all.

Flash playback on MacOSX Firefox

For a long time I've been annoyed by really jerky playback on Flash videos under Firefox on MacOSX.
This YouTube video for example, was just awful to watch, stuttering very frequently.

Turns out the fix is pretty simple: just go into about:config and increase the browser.sessionstore.interval setting in Firefox from the default of 10000 (10 seconds) to something larger like 120000 (120 seconds).
Got it from this page, even though it's talking about Ubuntu Firefox, it still applies to MacOSX and seems to have made a world of difference.

amqplib and bpgsql on Google Code

I've created Google Code projects for my amqplib and bpgsql packages, to take advantage of their nice infrastructure including issue tracking.

amqplib 0.6

Wrapped up another release of py-amqplib, version 0.6 - which features a major reorganization of the codebase to make the library more maintainable and lays the groundwork for an optional thread-assisted mode that allows for flow control and timeouts (being worked on in a development repository).